Linux第66步_linux字符设备驱动_挂载和卸载
1、了解linux中的驱动类型:
1)、字符设备驱动
字符设备是limnux驱动中最基本的一类设备驱动,字符设备就是一个一个字节,按照字节流进行读写操作的设备,读写数据是分先后顺序的。如:GPIO输入输出、UART、I2C、SPI、USB、LCD、音频等都属于字符设备驱动。
2)、块设备驱动
块设备驱动就是存储器设备的驱动,比如EMMC、NAND、SD卡和U盘等存储设备,因为这些存储设备的特点是以存储块为基础,因此叫做“块设备”。
3)、网络设备驱动网络设备就是网络驱动,不管是有线的,还是无线的,都属于网络设备驱动的范畴。
注意:
一个设备可以属于多种设备驱动类型,比如:USB WIFI,其使用USB接口,所以属于字符设备,但是其又能上网,所以它又属于网络设备驱动。
2、了解Limux应用程序调用驱动程序的流程
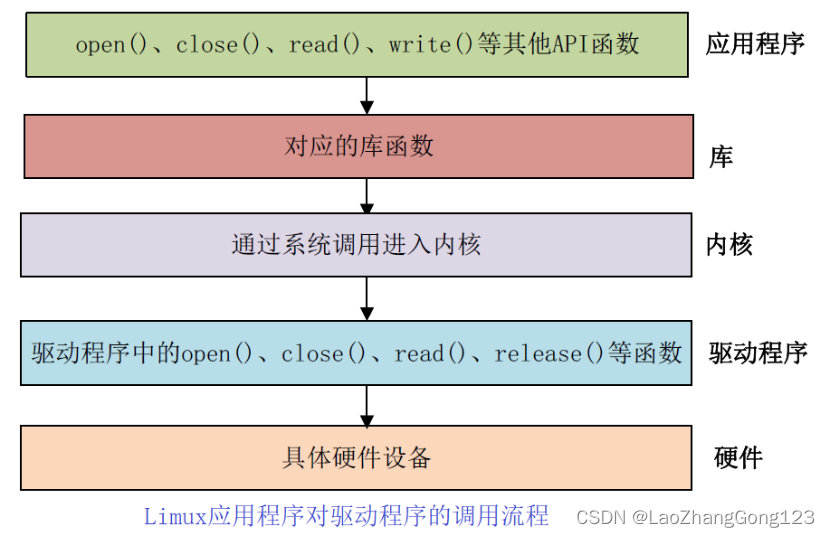
在Linux中一切皆为文件。驱动加载成功以后会在“/dev”目录下生成一个相应的驱动文件,如“xxx”的驱动文件名。应用程序通过对“/dev/xxx”的文件进行相应的操作,就可实现对硬件的操作。比如:现在有个叫做“/dev/led ”的驱动文件,它是1ed灯的驱动文件。应用程序使用“open函数”打开驱动文件“/dev/led ”,然后使用“close函数”关闭驱动文件“/dev/led”。open和close 就是打开和关闭led驱动的函数,如果要点亮或关闭1ed,那么就使用write函数来操作,也就是向此驱动写入数据,这个数据就是要关闭还是要打开led的控制参数。如果要获取led灯的状态,就用read函数从驱动中读取相应的状态。应用程序运行在用户空间,而limux驱动属于内核的一部分,因此驱动运行于内核空间。当我们在用户空间想要实现对内核进行操作,比如使用open函数打开/dev/led这个驱动,因为用户空间不能直接对内核进行操作,因此必须使用一个叫做“系统调用”的方法来实现从用户空间“陷入”到内核空间,这样才能实现对底层驱动的操作。open、close、write和read等这些函数是由C库提供的,在Limux系统中,系统调用作为C库的一部分。
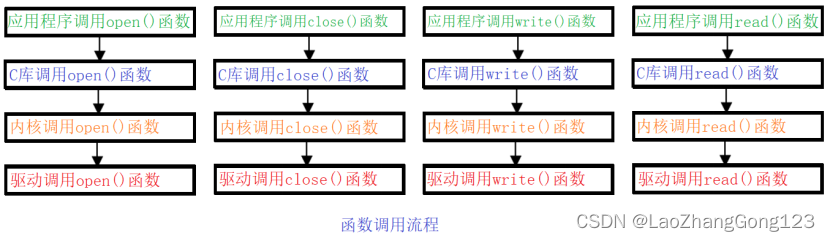
我们重点关注的时应用程序调用的函数和驱动调用的函数,至于C库和内核调用的函数,我们不用去关心。
3、了解“file_operations”结构体
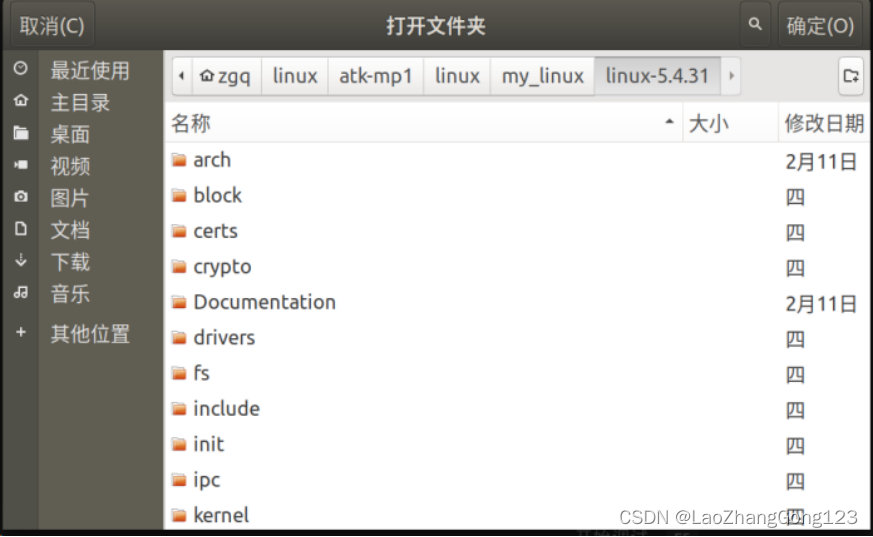
打开虚拟机上“VSCode”,点击“文件”,点击“打开文件夹”,点击“zgq”,点击“linux”,点击“atk-mp1”,点击“linux”,点击“my_linux”,点击“linux-5.4.31”,见下图:
点击“确定”
点击“查看”,点击“搜索”,输入“struct file_operations”
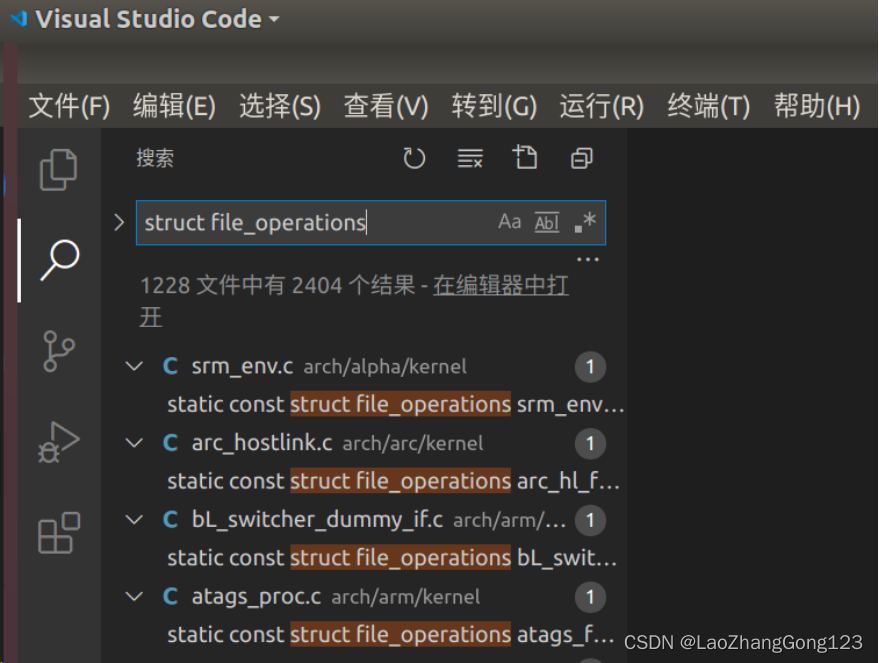
随便点击其中一个“struct file_operations”,得到下面的界面:
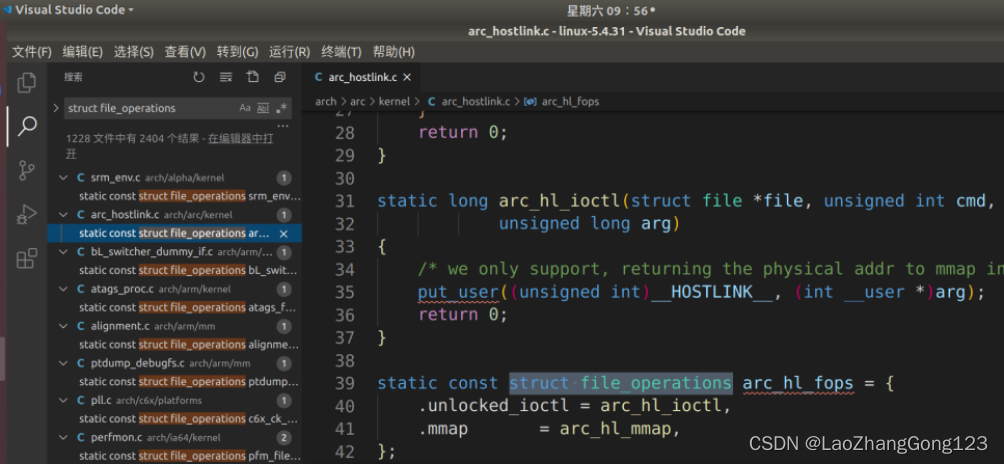
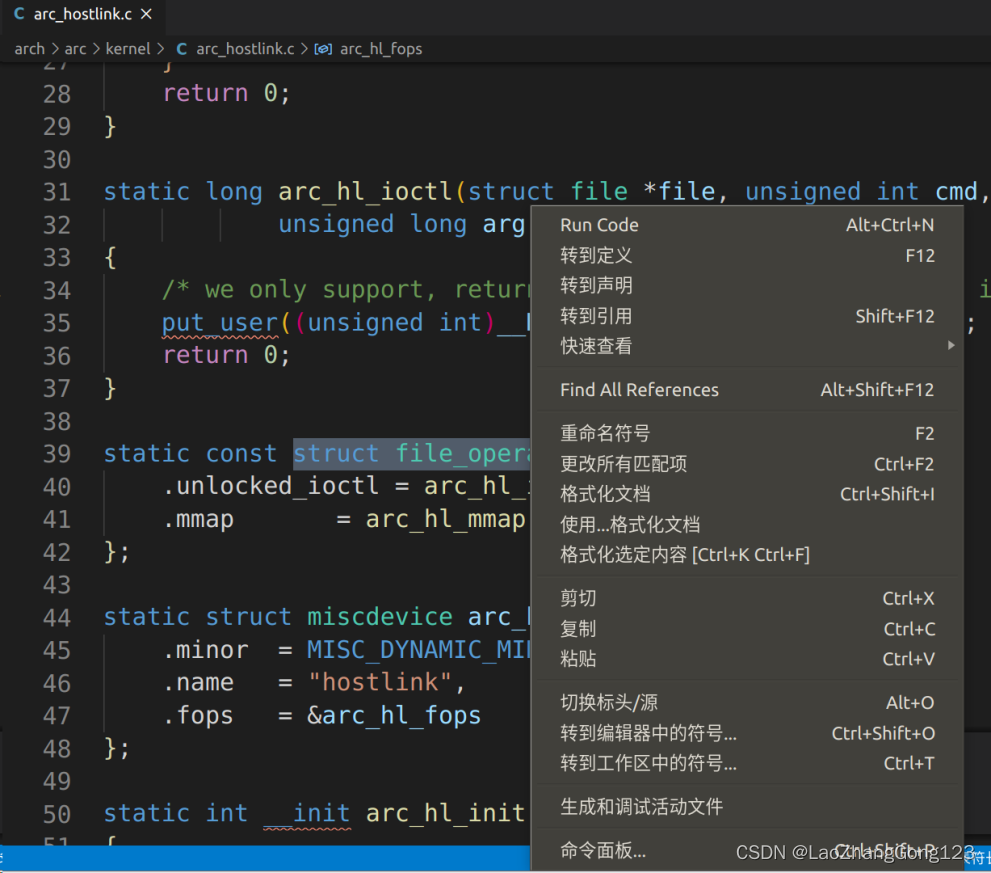
在“file_operations”点击“鼠标右键”,点击“转到定义”,见下图:
得到下图:
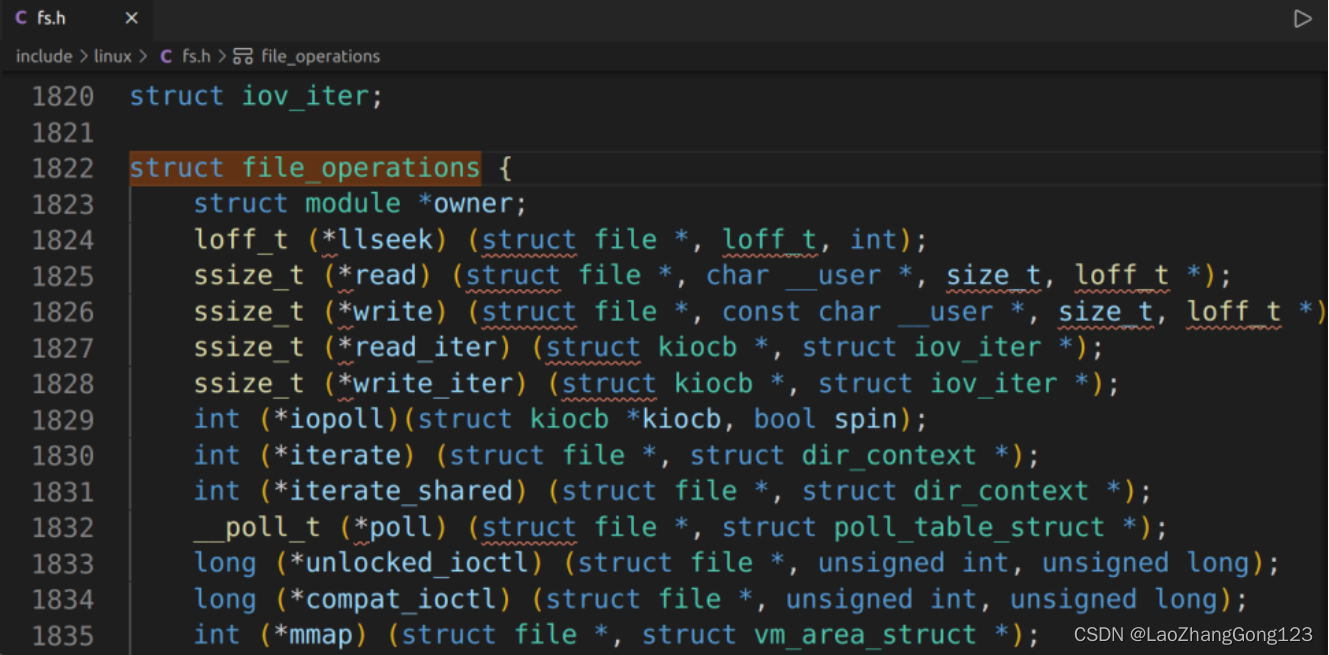
字符设备驱动重点是“file_operations”结构体
“fs.h”定义“file_operations”结构体如下:
struct file_operations {
struct module *owner;
loff_t (*llseek) (struct file *, loff_t, int);
ssize_t (*read) (struct file *, char __user *, size_t, loff_t *);
ssize_t (*write) (struct file *, const char __user *, size_t, loff_t *);
ssize_t (*read_iter) (struct kiocb *, struct iov_iter *);
ssize_t (*write_iter) (struct kiocb *, struct iov_iter *);
int (*iopoll)(struct kiocb *kiocb, bool spin);
int (*iterate) (struct file *, struct dir_context *);
int (*iterate_shared) (struct file *, struct dir_context *);
__poll_t (*poll) (struct file *, struct poll_table_struct *);
long (*unlocked_ioctl) (struct file *, unsigned int, unsigned long);
long (*compat_ioctl) (struct file *, unsigned int, unsigned long);
int (*mmap) (struct file *, struct vm_area_struct *);
unsigned long mmap_supported_flags;
int (*open) (struct inode *, struct file *);
int (*flush) (struct file *, fl_owner_t id);
int (*release) (struct inode *, struct file *);
int (*fsync) (struct file *, loff_t, loff_t, int datasync);
int (*fasync) (int, struct file *, int);
int (*lock) (struct file *, int, struct file_lock *);
ssize_t (*sendpage) (struct file *, struct page *, int, size_t, loff_t *, int);
unsigned long (*get_unmapped_area)(struct file *, unsigned long, unsigned long, unsigned long, unsigned long);
int (*check_flags)(int);
int (*flock) (struct file *, int, struct file_lock *);
ssize_t (*splice_write)(struct pipe_inode_info *, struct file *, loff_t *, size_t, unsigned int);
ssize_t (*splice_read)(struct file *, loff_t *, struct pipe_inode_info *, size_t, unsigned int);
int (*setlease)(struct file *, long, struct file_lock **, void **);
long (*fallocate)(struct file *file, int mode, loff_t offset,
loff_t len);
void (*show_fdinfo)(struct seq_file *m, struct file *f);
#ifndef CONFIG_MMU
unsigned (*mmap_capabilities)(struct file *);
#endif
ssize_t (*copy_file_range)(struct file *, loff_t, struct file *,
loff_t, size_t, unsigned int);
loff_t (*remap_file_range)(struct file *file_in, loff_t pos_in,
struct file *file_out, loff_t pos_out,
loff_t len, unsigned int remap_flags);
int (*fadvise)(struct file *, loff_t, loff_t, int);
} __randomize_layout;
/* 设备操作函数结构体 */
static struct file_operations chrdevbase_fops = {
.owner = THIS_MODULE,
.open = chrdevbase_open,
.read = chrdevbase_read,
.write = chrdevbase_write,
.release = chrdevbase_release,
};
4、了解“linux-5.4.31”中的驱动
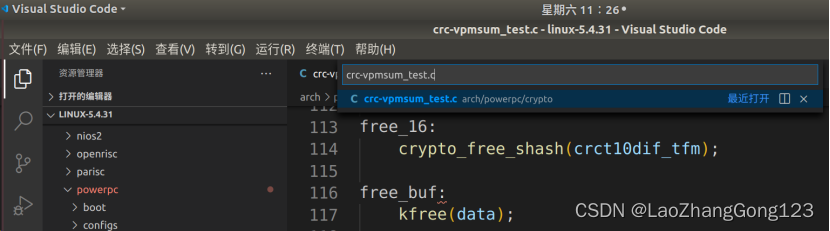
下面我们通过“crc-vpmsum_test.c”来学习linux驱动的编写:
1)、点击“转到”,点击“转到文件”,在输入框中输入“crc-vpmsum_test.c”,按“回车键”打开“crc-vpmsum_test.c”
见下图:
“crc-vpmsum_test.c”内容如下:
// SPDX-License-Identifier: GPL-2.0-only
/*
* CRC vpmsum tester
* Copyright 2017 Daniel Axtens, IBM Corporation.
*/
#include <linux/crc-t10dif.h>
#include <linux/crc32.h>
#include <crypto/internal/hash.h>
#include <linux/init.h> //必须要包含的头文件
#include <linux/module.h> //必须要包含的头文件
#include <linux/string.h> //下面要用到字符串,显然也要包含
#include <linux/kernel.h> //必须要包含的头文件
#include <linux/cpufeature.h>
#include <asm/switch_to.h>
static unsigned long iterations = 10000;
#define MAX_CRC_LENGTH 65535
/*入口函数初始化*/
static int __init crc_test_init(void)
{
u16 crc16 = 0, verify16 = 0;
u32 crc32 = 0, verify32 = 0;
__le32 verify32le = 0;
unsigned char *data;
unsigned long i;
int ret;
struct crypto_shash *crct10dif_tfm;
struct crypto_shash *crc32c_tfm;
if (!cpu_has_feature(CPU_FTR_ARCH_207S))
return -ENODEV;
data = kmalloc(MAX_CRC_LENGTH, GFP_KERNEL);
if (!data)
return -ENOMEM;
crct10dif_tfm = crypto_alloc_shash("crct10dif", 0, 0);
if (IS_ERR(crct10dif_tfm)) {
pr_err("Error allocating crc-t10dif\n");
goto free_buf;
}
crc32c_tfm = crypto_alloc_shash("crc32c", 0, 0);
if (IS_ERR(crc32c_tfm)) {
pr_err("Error allocating crc32c\n");
goto free_16;
}
do {
SHASH_DESC_ON_STACK(crct10dif_shash, crct10dif_tfm);
SHASH_DESC_ON_STACK(crc32c_shash, crc32c_tfm);
crct10dif_shash->tfm = crct10dif_tfm;
ret = crypto_shash_init(crct10dif_shash);
if (ret) {
pr_err("Error initing crc-t10dif\n");
goto free_32;
}
crc32c_shash->tfm = crc32c_tfm;
ret = crypto_shash_init(crc32c_shash);
if (ret) {
pr_err("Error initing crc32c\n");
goto free_32;
}
pr_info("crc-vpmsum_test begins, %lu iterations\n", iterations);
for (i=0; i<iterations; i++) {
size_t offset = prandom_u32_max(16);
size_t len = prandom_u32_max(MAX_CRC_LENGTH);
if (len <= offset)
continue;
prandom_bytes(data, len);
len -= offset;
crypto_shash_update(crct10dif_shash, data+offset, len);
crypto_shash_final(crct10dif_shash, (u8 *)(&crc16));
verify16 = crc_t10dif_generic(verify16, data+offset, len);
if (crc16 != verify16) {
pr_err("FAILURE in CRC16: got 0x%04x expected 0x%04x (len %lu)\n",
crc16, verify16, len);
break;
}
crypto_shash_update(crc32c_shash, data+offset, len);
crypto_shash_final(crc32c_shash, (u8 *)(&crc32));
verify32 = le32_to_cpu(verify32le);
verify32le = ~cpu_to_le32(__crc32c_le(~verify32, data+offset, len));
if (crc32 != (u32)verify32le) {
pr_err("FAILURE in CRC32: got 0x%08x expected 0x%08x (len %lu)\n",
crc32, verify32, len);
break;
}
}
pr_info("crc-vpmsum_test done, completed %lu iterations\n", i);
} while (0);
free_32:
crypto_free_shash(crc32c_tfm);
free_16:
crypto_free_shash(crct10dif_tfm);
free_buf:
kfree(data);
return 0;
}
/*出口函数初始化*/
static void __exit crc_test_exit(void) {}
module_init(crc_test_init);/*将crc_test_init()指定为入口函数*/
module_exit(crc_test_exit); /*将crc_test_exit()指定为出口函数*/
module_param(iterations, long, 0400);
MODULE_AUTHOR("Daniel Axtens <dja@axtens.net>");//添加作者名字
MODULE_DESCRIPTION("Vector polynomial multiply-sum CRC tester");
//从字面意思上看,指的是模块介绍
MODULE_LICENSE("GPL");//LICENSE采用“GPL协议”
上面的程序用到“pr_err()和pr_info()”,通过查找,它们都是调用“printk()”,内容如下:
#define pr_err(fmt, ...) \
printk(KERN_ERR pr_fmt(fmt), ##__VA_ARGS__)
#define pr_info(fmt, ...) \
printk(KERN_INFO pr_fmt(fmt), ##__VA_ARGS__)
因此,我们知道linux的串口输出是调用printk()来实现的,相当于C语言的printf()函数。
Linux驱动的运行方式:
1)、将驱动源码编译进Linux内核中,生成uImage/zImage系统镜像里面。
2)、将驱动源码编译成模块,生成以“.ko”结尾的文件,然后在Linux内核里加载驱动模块。也可以编译进内核,最终集成到uImage里面。
4、加载模块使用modprobe命令,卸载模块使用rmmod命令
比如执行“insmod drv.ko”加载“drv.ko”模块,由于drv.ko模块需要依赖first.ko模块,因此,要先执行“insmod first.ko”,然后再执行“insmod drv.ko”,才可以加载。而执行“modprobe drv.ko”加载“drv.ko”模块,它会分析first.ko和drv.ko模块之间的依赖关系,自动将“first.ko和drv.ko”加载到内核中。因此加载驱动使用modprobe命令。
在卸载的时候,执行“rmmod drv.ko”就可以卸载了,而modprobe命令在分析出“first.ko和drv.ko”模块之间有依赖关系,若first.ko被其它模块使用le,就不能执行“modprobe -r drv”;若first.ko没有被其它模块使用,就可以执行“modprobe -r drv”;。因此卸载模块使用insmod命令。
注意:
Limnux kemnel的版本号为5.4.31,modprobe命令就会到“/lib/modules/5.4.31”目录中去查找相应的驱动模块,因此我们需要将编写好的驱动会放到“/lib/modules/5.4.31”目录中。
5、“字符设备加载与卸载模板”
/*驱动入口函数 */static int __init xxx init(void){ /*入口函数具体内容 */ return 0;}
/*驱动出口函数 */static void __exit xxx_exit(void){ /*出口函数具体内容 */}
module_init(xxx_init); //声明xxx_init()为驱动入口函数
module_exit(xxx_exit); //声明xxx_exit()为驱动出口函数
通过“crc-vpmsum_test.c”学习,我们仿写一个驱动,命名为My_TestDriver.c。
1)、创建“/home/zgq/linux/Linux_Drivers/00_My_TestDriver/”目录
输入“cd /home/zgq/linux/Linux_Drivers/”
切换到“/home/zgq/linux/Linux_Drivers/”目录
输入“mkdir 00_My_TestDriver”
创建“/home/zgq/linux/Linux_Drivers/00_My_TestDriver/”目录
输入“ls”,查询“/home/zgq/linux/Linux_Drivers/”目录下的文件和文件夹
输入“cd 00_My_TestDriver/”
切换到“/home/zgq/linux/Linux_Drivers/00_My_TestDriver/”目录
输入“vi My_TestDriver.c”打开“My_TestDriver.c”
输入内容如下:
#include <linux/init.h> //必须要包含的头文件
#include <linux/module.h> //必须要包含的头文件
#include <linux/string.h> //下面要用到字符串,显然也要包含
#include <linux/kernel.h> //必须要包含的头文件
/*入口函数初始化*/
static int __init My_TestDriver_init(void)
{
int ret = 0;
printk("My_TestDriver_init\r\n");
return ret;
}
/*出口函数初始化*/
static void __exit My_TestDriver_exit(void)
{
printk("My_TestDriver_exit\r\n");
}
module_init(My_TestDriver_init);/*将My_TestDriver_init()指定为入口函数*/
module_exit(My_TestDriver_exit); /*将My_TestDriver_exit()指定为出口函数*/
MODULE_AUTHOR("Zhanggong");//添加作者名字
MODULE_DESCRIPTION("This is test module!");//模块介绍
MODULE_LICENSE("GPL");//LICENSE采用“GPL协议”
MODULE_INFO(intree,"Y");//去处显示“loading out-of-tree module taints kernel.”
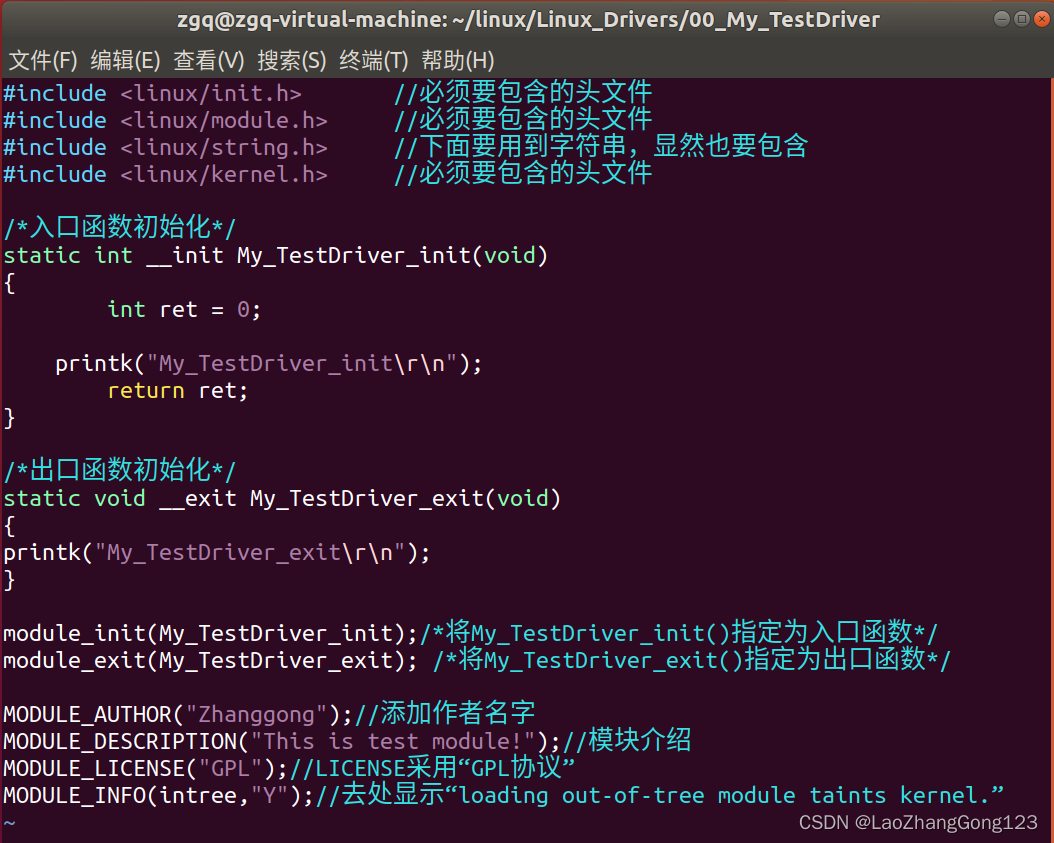
按“ESC键”,输入“:wq回车”
输入“vim Makefile”
添加内容如下:
KERNELDIR := /home/zgq/linux/atk-mp1/linux/my_linux/linux-5.4.31
#使用“:=”将其后面的字符串赋值给KERNELDIR
CURRENT_PATH := $(shell pwd)
#采用“shell pwd”获取当前打开的路径
#使用“$(变量名)”引用“变量的值”
obj-m := My_TestDriver.o
#生成“obj-m”需要依赖“My_TestDriver.o”
build: kernel_modules
#生成“build”需要依赖“kernel_modules”
@echo $(KERNELDIR)
#输出KERNELDIR的值为“/home/zgq/linux/atk-mp1/linux/linux-5.4.31”
@echo $(CURRENT_PATH)
#输出CURRENT_PATH的值为/home/zgq/linux/Linux_Drivers/00_My_TestDriver”
@echo $(MAKE)
#输出MAKE的值为make
kernel_modules:
$(MAKE) -C $(KERNELDIR) M=$(CURRENT_PATH) modules
#后面的"modules"表示编译成模块
#“KERNELDIR”上面定义为“/home/zgq/linux/atk-mp1/linux/my_linux/linux-5.4.31”,即“指定的工作目录”
#“CURRENT_PATH”上面定义为“当前的工作目录”
#“-C $(KERNELDIR) M=$(CURRENT_PATH) ”表示将“当前的工作目录”切换到“指定的目录”中
#即切换到“/home/zgq/linux/atk-mp1/linux/my_linux/linux-5.4.31”。
#M表示模块源码目录
#在“make和modules”之间加入“M=$(CURRENT_PATH)”,表示切换到由“CURRENT_PATH”指定的目录中读取源码,同时将其编>译为.ko 文件
clean:
$(MAKE) -C $(KERNELDIR) M=$(CURRENT_PATH) clean
#“KERNELDIR”上面定义为“/home/zgq/linux/atk-mp1/linux/my_linux/linux-5.4.31”,即“指定的工作目录”
#“CURRENT_PATH”上面定义为“当前的工作目录”

按“ESC键”,输入“:wq回车”
在linx驱动中的Makefile文件,有点像“八股文”,在格式上基本是固定的。
驱动测试
在连接开发板之前,需要将“My_TestDriver.ko”拷贝到“/home/zgq/linux/nfs/rootfs/lib/modules/5.4.31/”
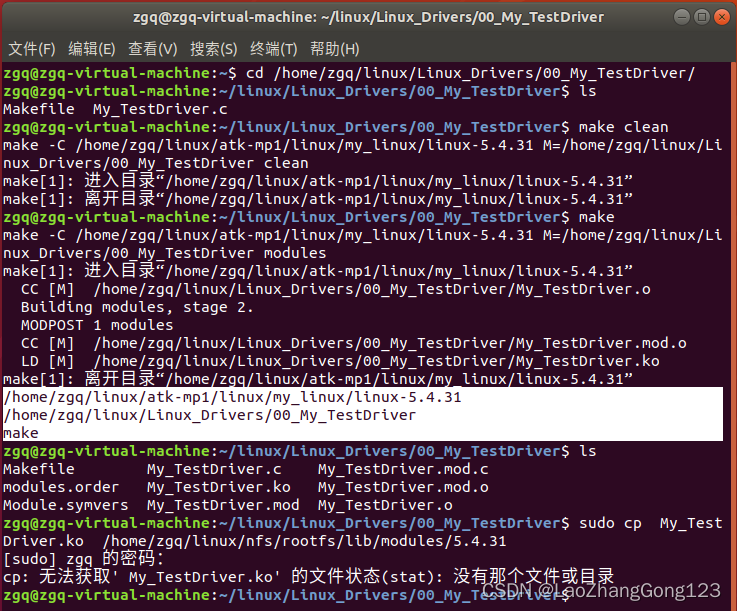
输入“cd /home/zgq/linux/Linux_Drivers/00_My_TestDriver/”
切换到“/home/zgq/linux/Linux_Drivers/00_My_TestDriver/”目录
输入“ls”,查询“/home/zgq/linux/Linux_Drivers/00_My_TestDriver/”目录下的文件和文件夹
输入“make clean回车”清除工程
输入“make回车”执行编译
输入“ls”,查询“/home/zgq/linux/Linux_Drivers/00_My_TestDriver/”目录下的文件和文件夹
输入“sudo cp My_TestDriver.ko /home/zgq/linux/nfs/rootfs/lib/modules/5.4.31”
将“My_TestDriver.ko”拷贝到“/home/zgq/linux/nfs/rootfs/lib/modules/5.4.31”
启动开发板,从网络下载程序
输入“root”
输入“cd /lib/modules/5.4.31/”
在nfs挂载中,切换到“/lib/modules/5.4.31/”目录
注意:“lib/modules/5.4.31/”在虚拟机中是位于“/home/zgq/linux/nfs/rootfs/”目录下,但在开发板中,却是位于根目录中。
输入“ls”
输入“depmod”,驱动在第一次执行时,需要运行“depmod”
输入“modprobe My_TestDriver.ko”,加载“My_TestDriver.ko”模块
输入“lsmod”查看有哪些驱动在工作
输入“rmmod My_TestDriver.ko”,卸载“My_TestDriver.ko”模块
注意:输入“rmmod My_TestDriver”也可以卸载“My_TestDriver.ko”模块
输入“lsmod”查看有哪些驱动在工作
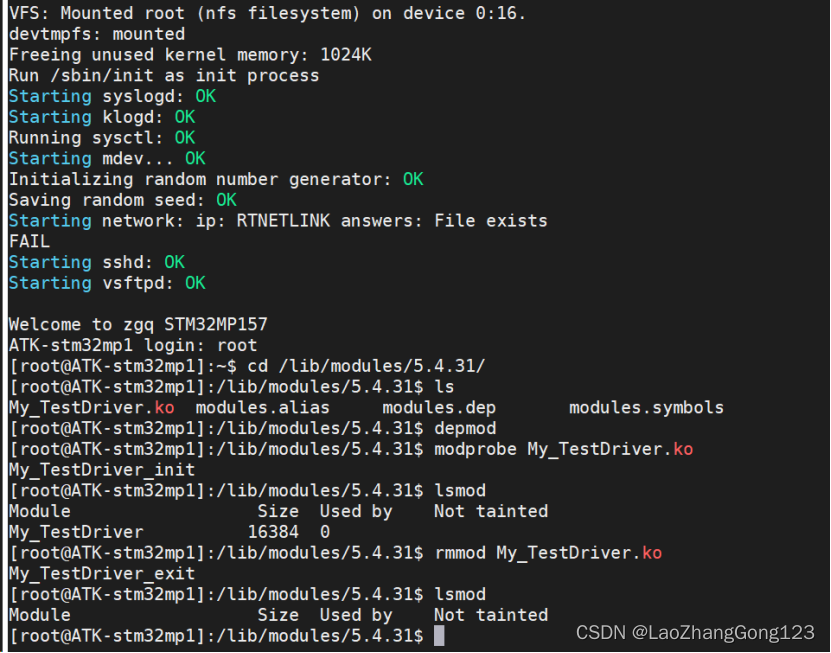
至此,我们完成了linux字符设备驱动的挂载和卸载。