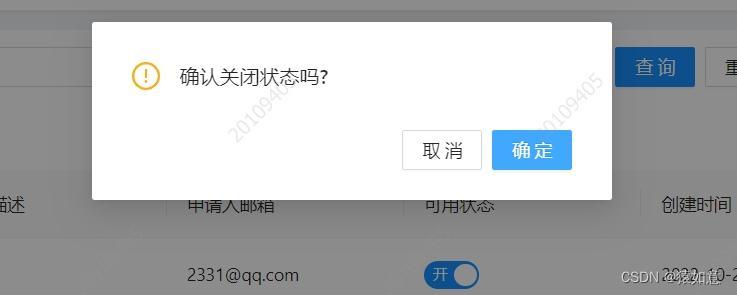
vue 的ant design的Switch开关不支持二次确认,自定义封装
原因:切换switch会直接触发状态改变,二次弹窗无法使用
实现效果图:

一、使用步骤
1.封装SwitchButton组件
代码如下:新建一个SwitchButton.vue的文件,最好放在公共组件中,也是方便后续使用
<template>
  <div :class="['d-switch', { 'is-checked': checked }]">
    <input
      class="d-switch__input"
      ref="input"
      type="checkbox"
      :checked="checked"
      @change="handleInput"
      :true-value="props.trueValue"
      :false-value="props.falseValue"
    />
    <span :class="['d-switch__label', { 'is-checked': checked }]">
      {{ checked ? props.trueName : props.falseName }}
    </span>
    <span class="d-switch_action"></span>
  </div>
</template>

<script setup>
import { computed, ref, nextTick } from 'vue';

const props = defineProps({
  modelValue: {
    // 绑定值
    type: [Number, String, Boolean],
  },
  modelRecord: {
    // 绑定的json
    type: Object,
  },
  trueValue: {
    // switch 打开时的值
    type: [Number, String, Boolean],
    default: true,
  },
  falseValue: {
    // switch 关闭时的值
    type: [Number, String, Boolean],
    default: true,
  },
  trueName: {
    // switch 打开时显示的文字
    type: String,
    default: '开',
  },
  falseName: {
    // switch 关闭时显示的文字
    type: String,
    default: '关',
  },
});

const emits = defineEmits(['update:modelValue', 'change']);

const input = ref(null);

// 判断当前组件是否是打开状态
const checked = computed(() => {
  // 因为可以自定义打开和关闭的值 所以这里必须判断 v-model绑定的值 === 组件自定义打开的值
  return props.modelValue === props.trueValue;
});

//input事件 获取当前input事件
const handleInput = () => {
  nextTick(() => {
    const val = input.value.checked;
    emits('update:modelValue', val);
    emits('change', props.modelRecord);
  });
};
</script>

<style lang="less" scoped>
.d-switch {
  position: relative;
  height: 22px;
  transition: background 0.2s;
  width: 44px;
  background: #00000040;
  border-radius: 100px;
  display: inline-flex;
  align-items: center;
  vertical-align: middle;
  .d-switch__input {
    position: relative;
    z-index: 1;
    margin: 0;
    width: 100%;
    height: 100%;
    opacity: 0;
    cursor: pointer;
  }
  .d-switch_action {
    position: absolute;
    transition: 0.2s;
    left: 2px;
    top: 2px;
    z-index: 0;
    height: 18px;
    width: 18px;
    background: #fff;
    border-radius: 50%;
  }
  &.is-checked {
    background-color: #1890ff;
    .d-switch_action {
      left: 100%;
      background: #fff;
      margin-left: -20px;
    }
  }
  .d-switch__label {
    position: absolute;
    margin: 0 7px 0 25px;
    color: #fff;
    font-size: 12px;
    transition: margin 0.2s;
    &.is-checked {
      margin: 0 25px 0 7px;
    }
  }
}
</style>
2.引入SwitchButton
import SwitchButton from '@/views/Common/SwitchButton';3.html中SwitchButton使用
<SwitchButton
            :modelValue="record.status"
            :modelRecord="record"
            :trueValue="1"
            :falseValue="0"
            @change="change(record)"
          ></SwitchButton>
siwtch中调用@change中的方法
const change = async (record) => {
  let str = record.status ? '关闭' : '启用';
  Modal.confirm({
    title: `确认${str}状态吗?`,
    icon: createVNode(ExclamationCircleOutlined),
    async onOk() {
      let params = {
        status: record.status ? 0 : 1,
        id: record.id,
      };
      let res = await setEditAccessInfo(params).catch(() => {
        message.error(`${str}失败`);
      });
      if (res) {
        record.status = record.status ? 0 : 1;
        message.success(`${str}成功`);
      }
    },
    onCancel() {},
  });
  return record;
};
总结
先二次确认提示,再改变状态