vue3.0——监听属性、Vue3生命周期函数、Teleport、属性传值、自定义事件、状态驱动的动态 CSS、注册组件、异步组件、占位组件 Suspense
一、监听属性-watch
-
与vue2.x中的watch配置功能一致
-
注意
-
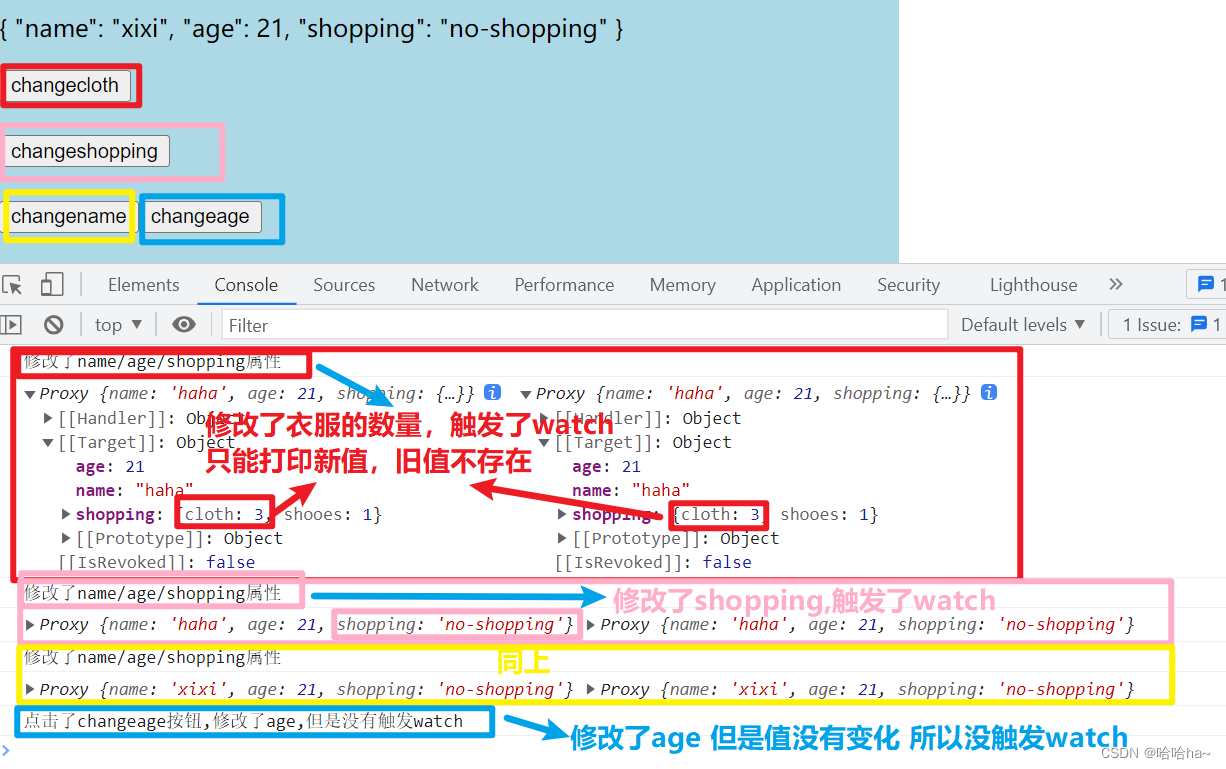
监视reactive定义的响应式数据时,oldvalue无法正确获取,强制开始了深度监视(deep的配置失效)
-
监视reactive定义的响应式数据的某一个值时:deep配置有效
-
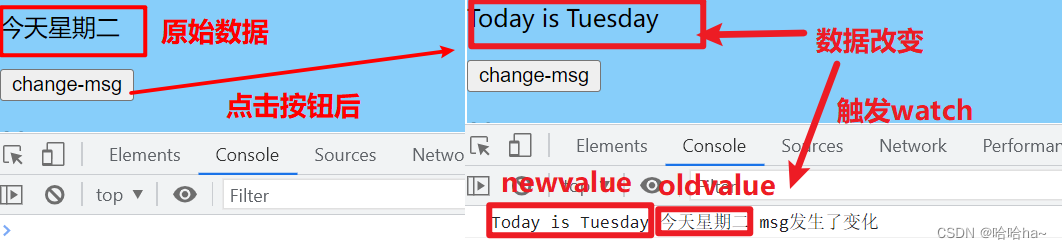
1.监听ref定义的响应式数据
示例:
<script setup>
import { ref, reactive, watch } from "vue";

//监听一个数据
let msg = ref("今天星期二");
function changemsg() {
  msg.value = "Today is Tuesday";
}
watch(msg, (newv, oldv) => {
  console.log(newv, oldv, "msg发生了变化");
});

</script>

  <template>
      <div>
       <p>{{msg}}</p>
       <button @click="changemsg">change-msg</button>
      </div>
  </template>
结果显示:
2.监听reactive定义的一个响应式数据的全部属性
示例:
<script setup>
import { reactive, watch } from "vue";

let user = reactive({name: "haha",age: 21,shopping: { cloth: 2, shooes: 1 }});
watch(user, function(newv, oldv) {
  console.log("修改了name/age/shopping属性");
  console.log(newv, oldv);
});
function changecloth() {
  user.shopping.cloth = 3;
}
function changeshopping() {
  user.shopping="no-shopping";
}
function changename() {
  user.name = "xixi";
}
function changeage() {
  user.age = 21;
  console.log("点击了changeage按钮,修改了age,但是没有触发watch")
}
</script>

      <template>
          <div class="box1">
            <p>{{user}}</p>
            <button @click="changecloth">changecloth</button><br /><br />
            <button @click="changeshopping">changeshopping</button><br /><br />
            <button @click="changename">changename</button>
            <button @click="changeage">changeage</button><br /><br />
          </div>
      </template>
显示结果:
二、Vue3生命周期
-
什么是生命周期?
Vue中每个组件都是独立的,每个组件都有一个属于它的生命周期,从一个组件创建、数据初始化、挂载、更新、销毁、这就是一个组件所谓的生命中周期
-
Vue2.x中的生命周期
beforeCreate created
beforeMount mounted
beforeUpdate updated
beforeDestroy destroyed
activated deactivated errorCaptured
-
Vue3.x的生命周期
在Vue3.x中,新增了一个setup生命周期函数,setup执行的时机是在beforeCreate之前,因为在这个函数中不能通过this来获取实例的;同时为了命名的统一,将beforeDestory改名为beforeUnmount,destoryed改名为unmounted
beforeCreate created(建议使用setup代替)
setup
beforeMount mounted
beforeUpdate updated
beforeUnmount unmounted
-
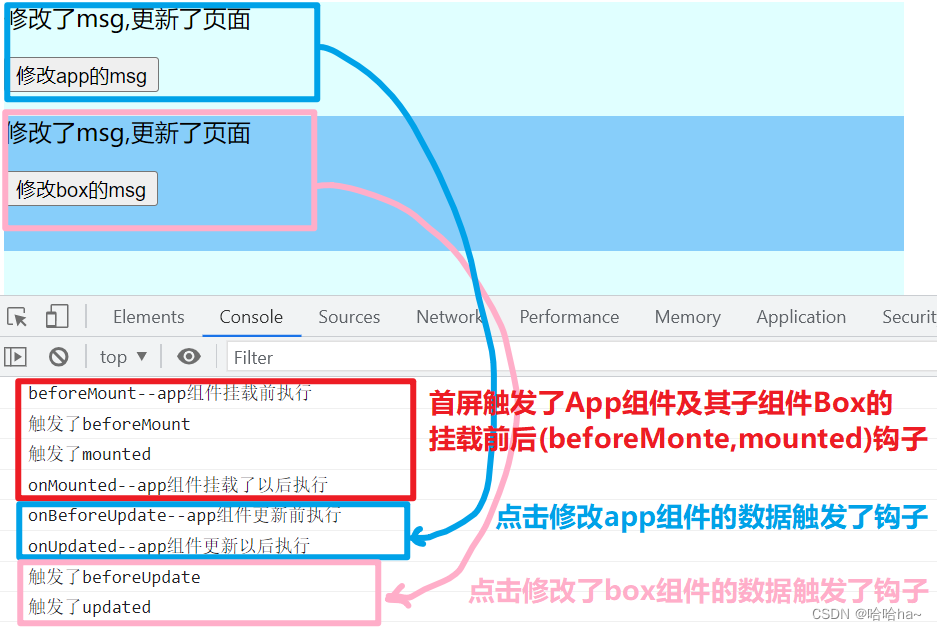
vue3新增了生命周期钩子,我们可以通过在生命周期函数前加on来访问组件的生命周期
Composition API 形式的生命周期钩子
onBeforeMount onMounted
onBeforeUpdate onUpdated
onBeforeUnmount onUnmounted
onErrorCaptured onRenderTracked onRenderTriggered
示例:
App.vue
<script setup>
import {onBeforeMount,onMounted,onBeforeUpdate,onUpdated,onBeforeUnmount,onUnmounted,ref} from "vue"
import Box from "./Box.vue";

   let msg =ref("哈哈");
    function changemsg() {
      msg.value = "修改了msg,更新了页面";
    }
  onBeforeMount(function() {
		console.log("beforeMount--app组件挂载前执行")
	})
	onMounted(function() {
		console.log("onMounted--app组件挂载了以后执行")
	})
  onBeforeUpdate(function() {
		console.log("onBeforeUpdate--app组件更新前执行")
	})
	onUpdated(function(){
		console.log("onUpdated--app组件更新以后执行")
	})
	onBeforeUnmount(function() {
		console.log("onBeforeUnmount--app组件销毁前执行")
	})
  onUnmounted(function() {
		console.log("onUnmounted--app组件销毁了以后执行")
	})
</script>

<template>
	<div class="app">
       <p>{{msg}}</p>
       <button @click="changemsg">修改app的msg</button>
       <Box></Box>
	</div>
</template>
Box.vue
<script>
  import {onBeforeMount,onMounted,onBeforeUpdate,onUpdated,onBeforeUnmount,onUnmounted,ref} from 'vue'

  export default {
    setup () {
      onBeforeMount (() => {console.log("触发了beforeMount")})
      onMounted (() => {console.log("触发了mounted")})
      onBeforeUpdate (() => {console.log("触发了beforeUpdate")})
      onUpdated (() => {console.log("触发了updated")})
      onBeforeUnmount (() => {console.log("触发了beforeDestroy")})
      onUnmounted (() => {console.log("触发了destroyed")})
      let msg =ref("嘻嘻");
       function changemsg() {
          msg.value = "修改了msg,更新了页面"
       }
      return {msg,changemsg}
    }
  }
  </script>

<template>
	<div class="box">
     <p>{{msg}}</p>
     <button @click="changemsg">修改box的msg</button>
	</div>
</template>
显示结果:
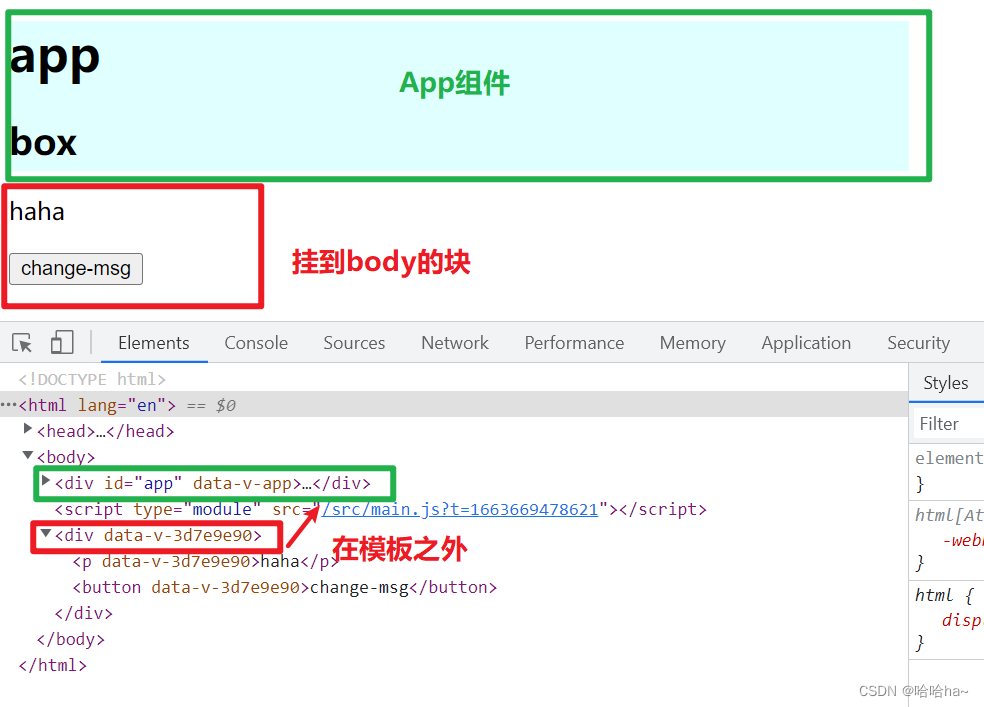
三、Teleport
- Vue 鼓励我们通过将 UI 和相关行为封装到组件中来构建 UI。我们可以将它们嵌套在另一个内部,以构建一个组成应用程序 UI 的树。
- 然而,有时组件模板的一部分逻辑上属于该组件,而从技术角度来看,最好将模板的这一部分移动到 DOM 中 Vue app 之外的其他位置
- to属性:放到指定位置
示例:
App.vue
<script setup>
  import Box from "./Box.vue"
</script>

<template>
	<div class="app">
    <h1>app</h1>
        <Box></Box>
	</div>
</template>
Box.vue
<script setup>
  import {ref} from "vue"
  let msg=ref("haha")
  let changemsg=()=>{
    msg.value="xixi"
  }
</script>

  <template>
    <div>
      <h2>box</h2>
      <teleport to="body">
        <div>
          <p @click="changemsg">{{msg}}</p>
          <button @click="changemsg">change-msg</button>
        </div>
      </teleport>
    </div>
  </template>
显示结果:
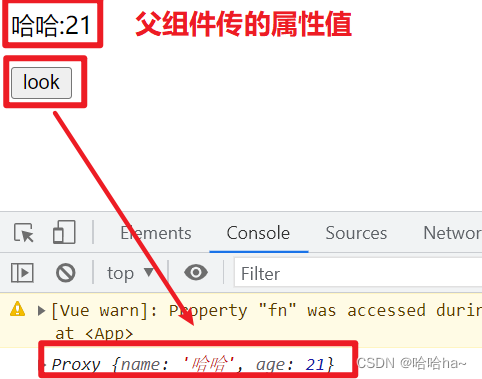
四、 属性传值
示例:
App.vue
<script setup>
  import Box from "./Box.vue"
  let haha="哈哈"
</script>

<template>
    <div>
      <Box :name="haha" :age=21 @myclick="fn"></Box>
    </div>
</template>
Box.vue
<script>
  export default {
     props:["name","age"],
     setup(props){
         let fn=()=>{console.log(props)}//必须在组件中注册属性不然setup函数收不到数据
         return {fn}
     }
  }
</script>
<template>
    <div>
       <p>{{name}}:{{age}}</p>
        <button @click="fn">look</button>
    </div>
</template>
结果显示:
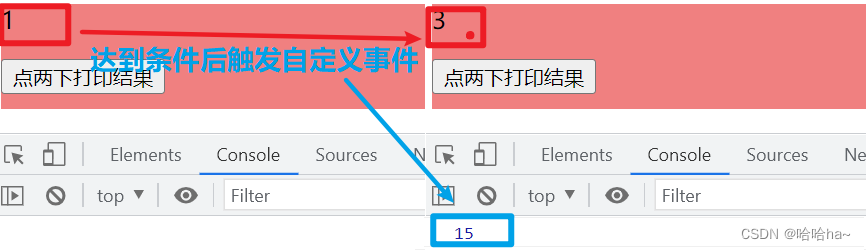
五、自定义事件
-
事件名
事件名提供了自动的大小写转换即如果在子组件中触发一个以 camelCase (驼峰式命名) 命名的事件,可以在父组件中添加一个 kebab-case (短横线分隔命名) 的监听器
示例:
App.vue
<script setup>
  import MyBox from "./MyBox.vue"
  function mysum(arg1,arg2){
		let sum=arg1+arg2
    console.log(sum)
	}
</script>

<template>
	<div>
	    <h1>app</h1>
		  <my-box @my-click="mysum"></my-box>
	</div>
</template>
MyBox.vue
<script setup>
	import {ref,watch,defineEmits} from "vue"
	let count=ref(1)
	let fm=()=>{
		count.value++
	}
	let emit=defineEmits()
	watch(count,(v)=>{
		if(v==3){
        //触发自定义事件的同时给父组件传值
		   	emit("myClick",5,10)
		}
	})
</script>

<template>
	<div class="box">
		<p>{{count}}</p>
		<button @click="fm">点两下打印结果</button>
	</div>
</template>
结果显示:
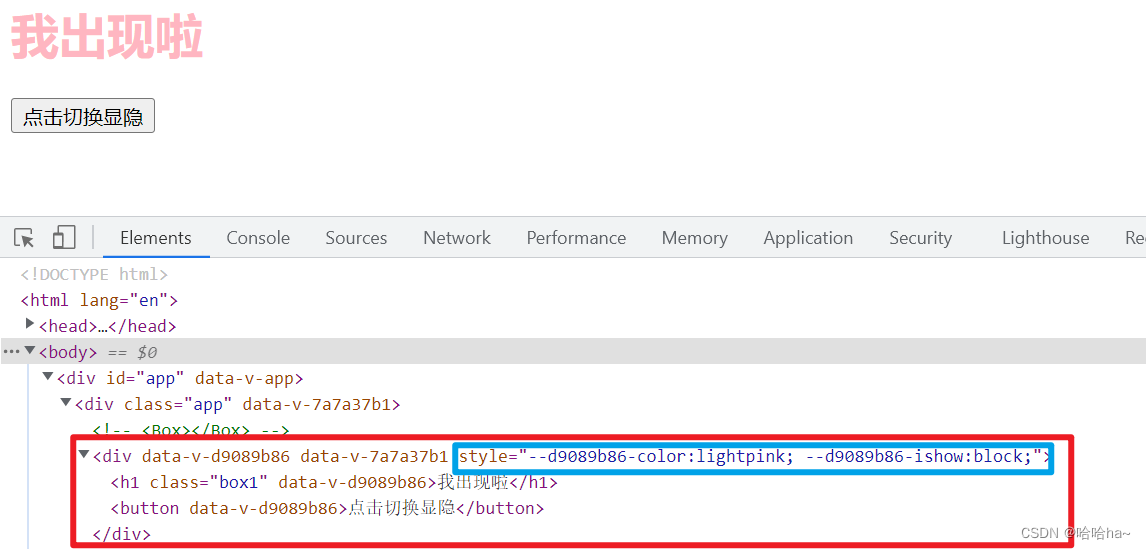
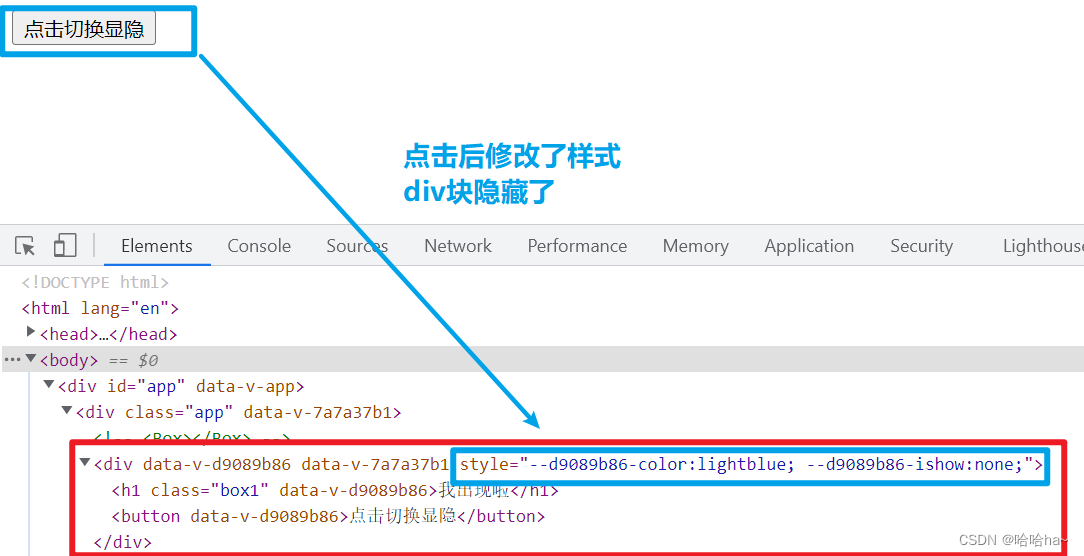
六、状态驱动的动态 CSS
- 单文件组件的
<style>标签可以通过v-bind这一 CSS 函数将 CSS 的值关联到动态的组件状态上
示例:
<script setup>
	import {ref} from "vue"

	let color = ref("lightpink")
	let ishow=ref("block")
	let flag=0
	let change=()=>{
		if(flag==0){
			color.value="lightblue"
		    ishow.value="none"
			flag=1
		}else{
			color.value="lightpink"
		    ishow.value="block"
			flag=0
		}
	}
</script>
<template>
	<div>
		<h1 class="box1">我出现啦</h1>
		<button @click="change">点击切换显隐</button>
	</div>
</template>

<style scoped lang="scss">
	.box1 {
		color: v-bind(color);
		display: v-bind(ishow);
	}
</style>
结果显示:
七、注册组件
1.组件内部注册:
<script>
    import Box1 from "./Box1.vue"
    export defult{
        components:{
            Box1
        },
        setup(){}
    }
</script>
<template>
    <Box1></Box1>
< /template>
2.vue3组件内部组合式API setup语法糖中注册组件
<script setup>
    import Box1 from "./Box1.vue"
    //只需要导入 不用写注册代码  会在打包的时候自动帮我们注册
</script>
<template>
    <Box1></Box1>
</template>
3.注册全局组件
//main.js文件:
import { createApp} from 'vue'
import App from './App.vue'
const app=createApp(App)
import Box1 from "./Box1.vue"
app.component(Box1.name,Box1)
app.mount('#app')//注意 一定要在app.mount之前注册全局组件 否则使用不了
//App.vue文件:
<template>
<Box1></Box1>
< /template>4.定义同步组件:
//Box1.vue文件:
<script>
  import {defineComponent} from "vue"
  export default defineComponent({
        data(){
            return {}
        },
        methods:{},
        setup(){
        }
    });
</script>
5.定义异步组件:
(1)局部异步组件
组件内部:
<script>
    import {defineAsyncComponent} from "vue"
    let Box1 = defineAsyncComponent(() => import("./Box1.vue"))
    //注意3.2之后不用引入defineAsyncComponent
    export default {
        components: {
            Box1
        },
        setup() {}
    }
</script>
setup语法糖:
<script setup>
    import {defineAsyncComponent} from "vue"
    let Box3=defineAsyncComponent(()=>import("./Box3.vue"))
   //注意3.2之后不用引入defineAsyncComponent,而且这个变量名直接就是注册的组件名(打包时自动注册的)
</script>
(2)全局异步组件
//main.js文件:
import { createApp,defineAsyncComponent} from 'vue'
import App from './App.vue'
const app=createApp(App)
let Box1=defineAsyncComponent(()=>import("./Box1.vue"))
app.component("Box1",Box1)
//注意 一定要在app.mount之前注册全局组件 否则使用不了
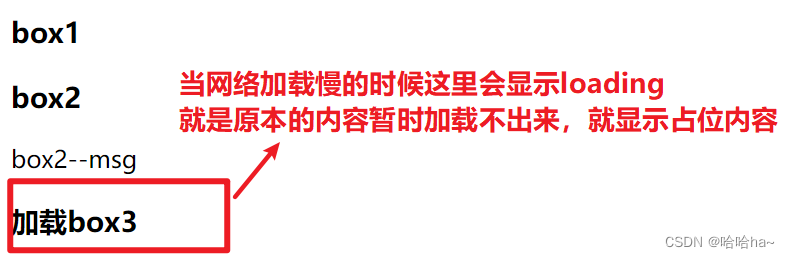
app.mount('#app')八、占位组件Suspense
-
等待异步组件时渲染一些额外的内容,让应用有更好的用户体验
<suspense>组件有两个插槽。它们都只接收一个直接子节点。 -
default插槽里的节点会尽可能展示出来。如果不能,则展示fallback插槽里的节点。
示例:
App.vue
<script setup>
  import Box1 from "./Box1.vue"
  import Box2 from "./Box2.vue"
  import {defineAsyncComponent} from "vue"
  let Box3=defineAsyncComponent(()=>import("./Box3.vue"))

</script>
<template>
<div>
  <Box1></Box1>
  <Box2></Box2>
  <suspense>
    <template #default>
      <Box3></Box3>
    </template>
    <template #fallback>
      <div>loading....</div>
    </template>
  </suspense>
  <Box4></Box4>
</div>
</template>
Box2.vue
<template>
	<div>
		<h3>box2</h3>
		<p>{{msg}}</p>
	</div>
</template>

<script>
	import {ref,defineComponent} from "vue"
	let Box2=defineComponent({
		setup(){
			let msg=ref("box2--msg")
			return {msg}
		}
	})
	export default Box2;
</script>
Box3.vue
<template>
	<div>
		<h3>加载box3</h3>
	</div>
</template>