Fragment的基本用法
一、Fragment简介
- 碎片是一种可以嵌在Activity中的UI片段,是一个小型的Activity,又称Activity片段。
- Fragment并不能单独使用,需要嵌套在Activity中使用。尽管它拥有自己的生命周期,但是还是会受到宿主Activity的生命周期的影响。
二、创建一个Fragment
1.静态加载Fragment
(1)创建Fragment布局文件
left_fragment.xml
<?xml version="1.0" encoding="utf-8"?>
<LinearLayout xmlns:android="http://schemas.android.com/apk/res/android"
    android:layout_width="match_parent"
    android:layout_height="match_parent">
    <Button
        android:id="@+id/button"
        android:layout_width="wrap_content"
        android:layout_height="wrap_content"
        android:layout_gravity="center"
        android:text="Button"/>
</LinearLayout>
right_fragment.xml
<?xml version="1.0" encoding="utf-8"?>
<LinearLayout xmlns:android="http://schemas.android.com/apk/res/android"
    android:layout_width="match_parent"
    android:layout_height="match_parent"
    android:background="#B9D6E3">
    <TextView
        android:layout_width="wrap_content"
        android:layout_height="wrap_content"
        android:layout_gravity="center"
        android:textSize="25sp"
        android:text="This is right Fragment"/>
</LinearLayout>
(2)自定义一个Fragment类,继承Fragment或者他的子类,重写onCreateView()方法 在该方法中调用:inflater.inflate()方法加载Fragment的布局文件,接着返回加载的view对象
public class LeftFragment extends Fragment {
    @Override
    public View onCreateView(@NonNull LayoutInflater inflater, @Nullable ViewGroup container, @Nullable Bundle savedInstanceState) {
        //加载布局
        View view = inflater.inflate(R.layout.left_fragment, container, false);
        return view;
    }
}
public class RightFragment extends Fragment {
    @Override
    public View onCreateView(@NonNull LayoutInflater inflater, @Nullable ViewGroup container, @Nullable Bundle savedInstanceState) {
        View view = inflater.inflate(R.layout.right_fragment,container,false);
        return view;
    }
}
inflate(int resource, @Nullable ViewGroup root, boolean attachToRoot) :加载布局文件
- 第一个参数:要加载的布局文件
- 第二个参数:第一个参数的父布局
- 第三个参数
(1)true:表示将第一个参数表示的布局添加到第二个参数的布局中
(2)false:不把第一个参数的布局添加到第二个参数的布局中
(3)在需要加载Fragment的Activity对应的布局文件中添加fragment的标签
activity_main.xml
<LinearLayout xmlns:android="http://schemas.android.com/apk/res/android"
    android:orientation="horizontal"
    android:layout_width="match_parent"
    android:layout_height="match_parent">
    <fragment
        android:id="@+id/left_frag"
        android:name="com.example.fragmenttest.LeftFragment"
        android:layout_width="0dp"
        android:layout_height="match_parent"
        android:layout_weight="1"/>
    <fragment
        android:id="@+id/right_frag"
        android:name="com.example.fragmenttest.RightFragment"
        android:layout_width="0dp"
        android:layout_height="match_parent"
        android:layout_weight="1"/>
</LinearLayout>
<fragment>:在布局中添加碎片
android:name:要添加的碎片的类名,该类名为全限定类名
(4)Activity在onCreate( )方法中调用setContentView()加载布局文件即可
MainActivity.java文件不修改
2.动态加载Fragment
(1)创建Fragment布局文件
left_fragment.xml
<LinearLayout xmlns:android="http://schemas.android.com/apk/res/android"
    android:layout_width="match_parent"
    android:layout_height="match_parent"
    android:background="#E696B1">
    <TextView
        android:layout_width="wrap_content"
        android:layout_height="wrap_content"
        android:layout_gravity="center"
        android:textSize="40sp"
        android:layout_marginLeft="20dp"
        android:textColor="#000000"
        android:text="这是本地视频"/>
</LinearLayout>
right_fragment.xml
<LinearLayout xmlns:android="http://schemas.android.com/apk/res/android"
    android:layout_width="match_parent"
    android:layout_height="match_parent"
    android:background="#B9D6E3">
    <TextView
        android:layout_width="wrap_content"
        android:layout_height="wrap_content"
        android:layout_gravity="center"
        android:textSize="40sp"
        android:layout_marginLeft="20dp"
        android:textColor="#000000"
        android:text="这是网络视频"/>
</LinearLayout>
(2)自定义一个Fragment类,继承Fragment或者他的子类,重写onCreateView()方法 在该方法中调用:inflater.inflate()方法加载Fragment的布局文件,接着返回加载的view对象
代码同静态加载
(3)activity.main.xml
<LinearLayout xmlns:android="http://schemas.android.com/apk/res/android"
    android:orientation="vertical"
    android:layout_width="match_parent"
    android:layout_height="match_parent">
    <LinearLayout
        android:layout_width="match_parent"
        android:layout_height="wrap_content"
        android:orientation="horizontal">
        <TextView
            android:id="@+id/menu1"
            android:layout_width="0dp"
            android:layout_height="match_parent"
            android:layout_weight="1"
            android:text="本地视频"
            android:gravity="center"
            android:textSize="30sp"/>
        <TextView
            android:id="@+id/menu2"
            android:layout_width="0dp"
            android:layout_height="match_parent"
            android:layout_weight="1"
            android:text="网络视频"
            android:gravity="center"
            android:textSize="30sp"/>
    </LinearLayout>
    <FrameLayout
        android:id="@+id/content"
        android:layout_width="match_parent"
        android:layout_height="0dp"
        android:layout_weight="8"/>
</LinearLayout>
(4)MainActivity
获得FragementManager对象——>开启事务,获得FragmentTransaction对象
——>调用replace()方法添加碎片到容器——>提交事务
public class MainActivity extends AppCompatActivity implements View.OnClickListener{
    private TextView menu1;
    private TextView menu2;
    private FrameLayout content;
    private FragmentManager fragmentManager;
    private FragmentTransaction transaction;
    private Fragment fragment1;
    private Fragment fragment2;

    @Override
    protected void onCreate(Bundle savedInstanceState) {
        super.onCreate(savedInstanceState);
        setContentView(R.layout.activity_main);
        initView();
        //获得FragmentManager对象
        fragmentManager = getSupportFragmentManager();
        //开启事务,获得FragmentTransaction对象
        transaction = fragmentManager.beginTransaction();
        //创建需要添加的Fragment
        fragment1 = new LeftFragment();
        fragment2 = new RightFragment();
        //向容器内添加或替换碎片,默认情况下为LeftFragment
        transaction.replace(R.id.content,fragment1);
        //提交事务
        transaction.commit();
    }
    //初始化控件
    private void initView() {
        menu1 = (TextView)findViewById(R.id.menu1);
        menu2 = (TextView)findViewById(R.id.menu2);
        content = (FrameLayout) findViewById(R.id.content);
        menu1.setOnClickListener(this);
        menu2.setOnClickListener(this);
    }

    @Override
    public void onClick(View view) {
        transaction = fragmentManager.beginTransaction();
        switch (view.getId()){
            case R.id.menu1:
                //点击menu1,内容替换为leftFragment
                transaction.replace(R.id.content,fragment1);
                break;
            case R.id.menu2:
                //点击menu1,内容替换为RightFragment
                transaction.replace(R.id.content,fragment2);
                break;
            default:
                break;
        }
        transaction.commit();
    }
}
注意:
FragmentTransaction只能使用一次,每次使用都要调用FragmentManager
的beginTransaction()方法获得FragmentTransaction事务对象
方法详解:
getSupportFragmentManager():获得FragmentManager
beginTransaction():开启事务,获得FragmentTransaction对象
replace(int containerViewId, Fragment fragment):向容器内添加碎片
commit():提交事务
- 第一个参数:要添加Fragment的容器
- 第二个参数:添加的Fragment实例
运行样式:
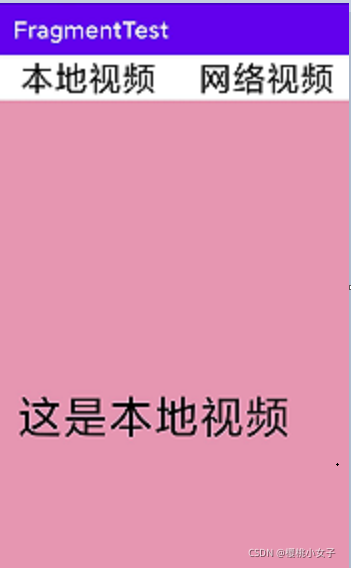
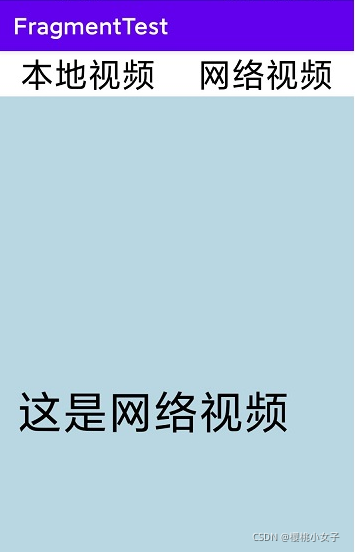
通过点击不同TextView得到不同Fragment
点击本地视频:
点击网络视频:
三、碎片和活动之间进行通信
1.组件获取
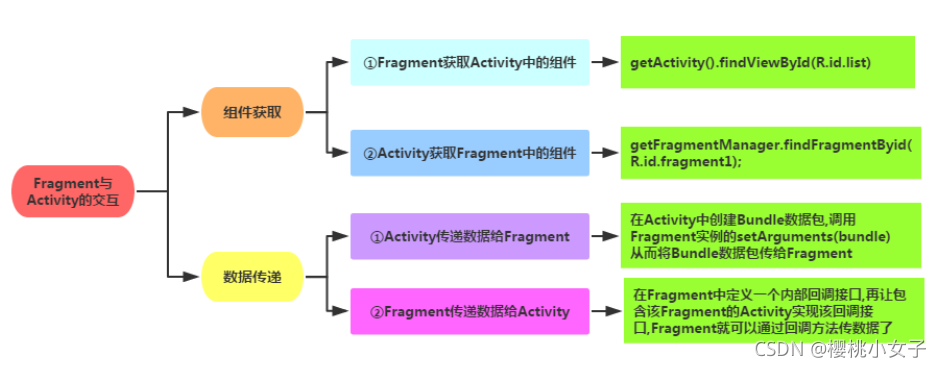
(1)Fragment获取Activity中的组件:
通过getActivity()方法得到和当前碎片相关联的活动。再通过findViewById()获取Activity中相应组件
getActivity().findViewById(R.id.list)
碎片中使用Context对象,可通过getActivity()方法获取
(2)Activity获取Fragment中的组件:
通过getFragmentManager()方法得到FragmentManager。调用FragmentManager的findFragmentById()方法得到碎片的实例
getFragmentManager().findFragmentById(R.id.right_fragment)
2.数据传递
(1)Activity传递数据给Fragment
在上一个例子的基础上修改代码:
right_fragment.xml
<LinearLayout xmlns:android="http://schemas.android.com/apk/res/android"
    android:layout_width="match_parent"
    android:layout_height="match_parent"
    android:orientation="vertical"
    android:background="#B9D6E3">
    <TextView
        android:layout_width="wrap_content"
        android:layout_height="wrap_content"
        android:layout_gravity="center"
        android:layout_marginLeft="20dp"
        android:textSize="40sp"
        android:textColor="#000000"
        android:text="这是网络视频" />
    <TextView
        android:id="@+id/text"
        android:layout_width="wrap_content"
        android:layout_height="wrap_content"
        android:layout_gravity="center"
        android:layout_marginTop="10dp"
        android:textSize="30sp"/>
    <Button
        android:id="@+id/button1"
        android:layout_width="wrap_content"
        android:layout_height="wrap_content"
        android:text="Button"
        android:layout_marginTop="10dp"
        android:layout_gravity="center"/>
</LinearLayout>
修改MainActivity代码如下:
public class MainActivity extends AppCompatActivity implements View.OnClickListener{
    ...
    @Override
    protected void onCreate(Bundle savedInstanceState) {
        super.onCreate(savedInstanceState);
        setContentView(R.layout.activity_main);
        initView();
       ...
        transaction.replace(R.id.content,fragment1);
        //创建Bundle对象
        Bundle bundle = new Bundle();
        //向Bundle对象中添加数据
        bundle.putString("message","视频加载中....");
        //把数据设置到Fragment中
        fragment2.setArguments(bundle);
        transaction.replace(R.id.content,fragment1);
        //提交事务
        transaction.commit();
    }
    //初始化控件
    private void initView() {
      ...
    }
    @Override
    public void onClick(View view) {
        ...
}
修改RightFragment代码如下:
public class RightFragment extends Fragment {
    private Button button;
    private TextView text;
    private Bundle bundle;
    private String message;
    @Override
    public View onCreateView(@NonNull LayoutInflater inflater, @Nullable ViewGroup container, @Nullable Bundle savedInstanceState) {
        View view = inflater.inflate(R.layout.right_fragment,container,false);
        button = view.findViewById(R.id.button1);
        text = view.findViewById(R.id.text);
        //获取从Activity传来的数据
        bundle = this.getArguments();
        //获取某一值
        message = bundle.getString("message");
        button.setOnClickListener(new View.OnClickListener() {
            @Override
            public void onClick(View view) {
                //显示传递过来的值
                text.setText(message);
            }
        });
        return view;
    }
}
方法详解:
setArguments(Bundle args):用于传递参数到Fragment,要传递的参数存放到Bundle对象中。
getArguments():获取Activity中传来的数据。返回值为Bundle对象。
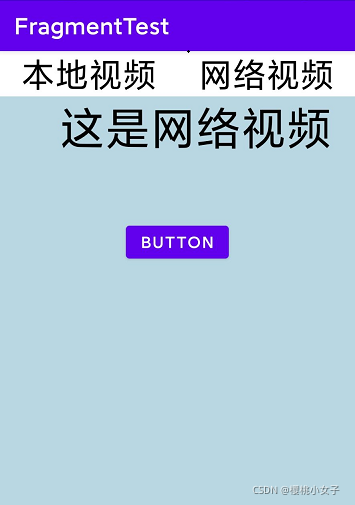
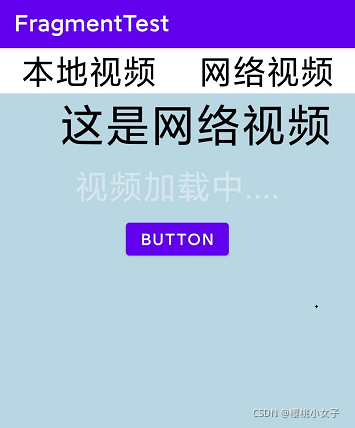
运行样式:
没点击按钮之前网络视频页面:
点击按钮接收Activity传来的消息,网络视频页面:
(2)Fragment传递数据给Activity
(1)编写布局文件
my_fragment.xml
<LinearLayout xmlns:android="http://schemas.android.com/apk/res/android"
    android:layout_width="match_parent"
    android:layout_height="match_parent"
    android:background="#E696B1">
    <TextView
        android:layout_width="wrap_content"
        android:layout_height="wrap_content"
        android:layout_gravity="center"
        android:layout_marginLeft="20dp"
        android:textColor="#000000"
        android:text="这是Fragment"
        android:textSize="40sp"/>
</LinearLayout>
activity_main.xml
<LinearLayout xmlns:android="http://schemas.android.com/apk/res/android"
    android:orientation="vertical"
    android:layout_width="match_parent"
    android:layout_height="match_parent">
   <TextView
        android:id="@+id/text"
        android:layout_width="wrap_content"
        android:layout_height="wrap_content"
        android:layout_gravity="center"
        android:textSize="30sp"
        android:textColor="#000000"/>
    <Button
        android:id="@+id/button"
        android:layout_width="wrap_content"
        android:layout_height="wrap_content"
        android:layout_gravity="center"
        android:text="Button"/>
    <FrameLayout
        android:id="@+id/content"
        android:layout_width="match_parent"
        android:layout_height="0dp"
        android:layout_weight="8"/>
</LinearLayout>
(2)设置回调接口,该接口用于用于Activity与Fragment通信
/*
    回调接口,用于Fragment和Activity之间通信
 */
public interface ICallBack {
    void getMessage(String message);
}
(3)自定义Fragment,设置接口回调方法
public class MyFragment extends Fragment {
    @Override
    public View onCreateView(@NonNull LayoutInflater inflater, @Nullable ViewGroup container, @Nullable Bundle savedInstanceState) {
        //加载布局
        View view = inflater.inflate(R.layout.left_fragment, container, false);
        return view;
    }
    //设置接口回调方法
    public void sendMessage(ICallBack callBack){
        callBack.getMessage("来自Fragment的消息");
    }
}
(4)MainActivity中调用接口回调方法
public class MainActivity extends AppCompatActivity {
    private TextView text;
    private Button button;
    private FragmentManager fragmentManager;
    private FragmentTransaction transaction;
    private MyFragment fragment;

    @Override
    protected void onCreate(Bundle savedInstanceState) {
        super.onCreate(savedInstanceState);
        setContentView(R.layout.activity_main);
        initView();
        fragmentManager = getSupportFragmentManager();
        transaction = fragmentManager.beginTransaction();
        fragment = new MyFragment();
        transaction.replace(R.id.content, fragment);
        transaction.commit();
    }
    private void initView() {
        text = (TextView) findViewById(R.id.text);
        button = (Button) findViewById(R.id.button);
        button.setOnClickListener(new View.OnClickListener() {
            @Override
            public void onClick(View view) {
                // 通过接口回调将消息从fragment发送到Activity
                fragment.sendMessage(new ICallBack() {
                    @Override
                    public void getMessage(String message) {
                        text.setText(message);
                    }
                });
            }
        });
    }
}
(3)Fragment和Fragment直接互相传递数据
FragmentManager fManager = getSupportFragmentManager( );
FragmentTransaction fTransaction = fManager.beginTransaction();
Fragmentone t1 = new Fragmentone();
Fragmenttwo t2 = new Fragmenttwo();
Bundle bundle = new Bundle();
bundle.putString("key",id);
t2.setArguments(bundle);
fTransaction.add(R.id.content, t2);
fTransaction.addToBackStack(t1);
fTransaction.commit();
addToBackStack(String name):添加一个事务到返回栈
四、碎片的生命周期
1.碎片的四种状态
(1)运行状态:
当一个碎片是可见的,且它关联的活动处于运行状态时,该碎片也处于运行状态
(2)暂停状态:
一个活动进入暂停状态,与它相关联的碎片就会进入暂停状态
(3)停止状态:
- 一个活动进入停止状态,与它相关联的碎片就会进入到停止状态
- 调用FragmentTransaction的remove()、replace()移除或替换活动中的碎片,且在事务提交之前调用addToBackStack()方法,碎片会进入停止状态
(4)销毁状态:
- 活动被销毁,与它相关联的碎片进行销毁状态
- 调用FragmentTransaction的remove()、replace()移除或替换活动中的碎片,碎片进入销毁状态。
2.碎片的生命周期
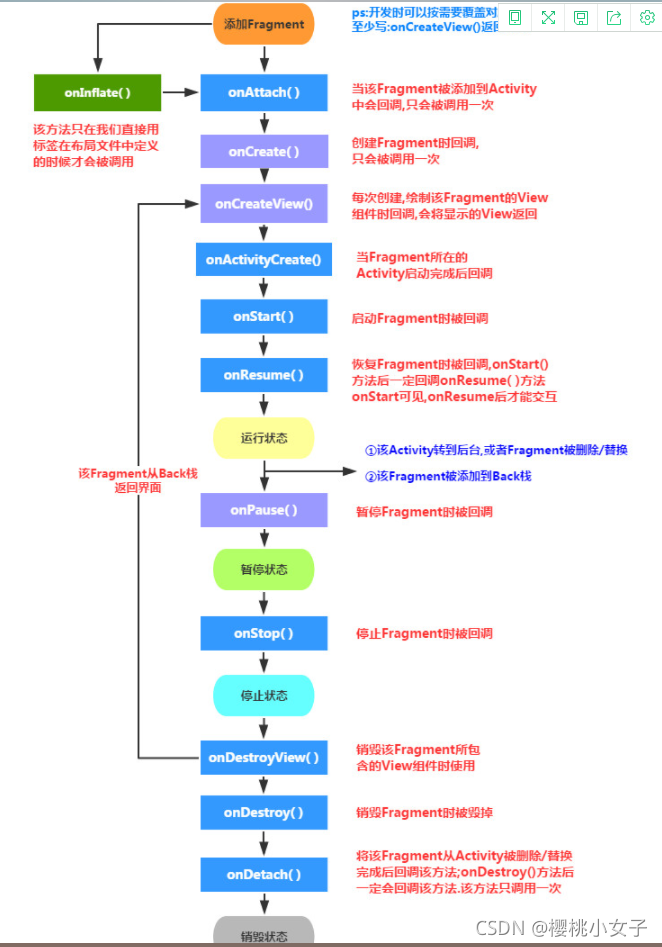
onAttach():Fragment被添加到Activity中会调用
onCreateView():当Fragment创建视图(加载布局)时调用
onActivityCreated():Fragment关联的Activity创建完毕时调用
onDestoryView():与碎片关联的视图被移除的时候调用
onDetach():当碎片与活动解除关联关系的时候调用
实例:
点击LeftFragment界面的Button按钮,RightFragment被替换为AnotherRightFragment,观察整个过程中RightFragment的生命周期:
重要代码:
activity_main.xml
<LinearLayout xmlns:android="http://schemas.android.com/apk/res/android"
    android:orientation="horizontal"
    android:layout_width="match_parent"
    android:layout_height="match_parent">
   <fragment
       android:id="@+id/left_content"
       android:name="com.example.fragmenttest.LeftFragment"
       android:layout_width="0dp"
       android:layout_height="match_parent"
       android:layout_weight="1"/>
    <FrameLayout
        android:id="@+id/right_content"
        android:layout_width="0dp"
        android:layout_height="match_parent"
        android:layout_weight="1"/>
</LinearLayout>
RightFragment.java
public class RightFragment extends Fragment {
    public static final String TAG = "RightFragment";
    @Override
    public void onAttach(@NonNull Context context) {
        super.onAttach(context);
        Log.d(TAG,"onAttach");
    }

    @Override
    public void onCreate(@Nullable Bundle savedInstanceState) {
        super.onCreate(savedInstanceState);
        Log.d(TAG,"onCreate");
    }
    @Override
    public View onCreateView(@NonNull LayoutInflater inflater, @Nullable ViewGroup container, @Nullable Bundle savedInstanceState) {
        Log.d(TAG,"onCreateView");
        View view = inflater.inflate(R.layout.right_fragment,container,false);
        return view;
    }
    @Override
    public void onActivityCreated(@Nullable Bundle savedInstanceState) {
        super.onActivityCreated(savedInstanceState);
        Log.d(TAG,"onActivityCreated");
    }

    @Override
    public void onStart() {
        super.onStart();
        Log.d(TAG,"onStart");
    }

    @Override
    public void onResume() {
        super.onResume();
        Log.d(TAG,"onResume");
    }

    @Override
    public void onPause() {
        super.onPause();
        Log.d(TAG,"onPause");
    }

    @Override
    public void onStop() {
        super.onStop();
        Log.d(TAG,"onStop");
    }

    @Override
    public void onDestroyView() {
        super.onDestroyView();
        Log.d(TAG,"onDestoryView");
    }

    @Override
    public void onDestroy() {
        super.onDestroy();
        Log.d(TAG,"onDestory");
    }

    @Override
    public void onDetach() {
        super.onDetach();
        Log.d(TAG,"onDetach");
    }
}
MainActivity.java
public class MainActivity extends AppCompatActivity implements View.OnClickListener{
    private FragmentManager fragmentManager;
    private FragmentTransaction transaction;

    @Override
    protected void onCreate(Bundle savedInstanceState) {
        super.onCreate(savedInstanceState);
        setContentView(R.layout.activity_main);
        Button button = (Button) findViewById(R.id.button);
        button.setOnClickListener(this);
        replaceFragment(new RightFragment());
    }
    @Override
    public void onClick(View view) {
        switch (view.getId()){
            case R.id.button:
                replaceFragment(new AnotherRightFragment());
                break;
            default:
                break;
        }
    }
    public void replaceFragment(Fragment fragment){
        fragmentManager = getSupportFragmentManager();
        transaction = fragmentManager.beginTransaction();
        transaction.replace(R.id.right_content, fragment);
        transaction.commit();
    }
}
打印结果:
(1)RightFragment第一次被加载,依次执行:
onAttach()、onCreate()、onCreateView()、onActivityCreated()、onStart()、onResume()
(2)点击Button按钮,AnotherRightFragment替换了RightFragment。RightFragment被销毁,依次执行:
onPause()、onStop()、onDestoryView()、onDestory()、onDetch()
(3)按下Back键,RightFragment会重新回到屏幕,依次执行;
onAttach()、onCreate()、onCreateView()、onActivityCreated()、onStart()、onResume()
(4)再按Back键会退出程序,依次执行:
onPause()、onStop()、onDestoryView()、onDestory()、onDetch()
如果息屏:执行onPause()、onStop()方法;
再摁亮屏幕:执行onStart()、pnResume()方法
修改MainActivity.java的代码如下:
 public void replaceFragment(Fragment fragment){
        fragmentManager = getSupportFragmentManager();
        transaction = fragmentManager.beginTransaction();
        transaction.replace(R.id.right_content, fragment);
        //将事务添加到返回栈中
        transaction.addToBackStack(null);
        transaction.commit();
    }
打印结果:
(1)RightFragment第一次被加载,依次执行:
onAttach()、onCreate()、onCreateView()、onActivityCreated()、onStart()、onResume()
(2)点击Button按钮,AnotherRightFragment替换了RightFragment。RightFragment进入停止状态,依次执行:
onPause()、onStop()、onDestoryView()
(3)按下Back键,RightFragment会重新回到屏幕,依次执行;
onCreateView()、onActivityCreated()、onStart()、onResume()
因为RightFragment没有被销毁,只是进入停止状态了。所以重新回到运行状态不会执行onCreate()
(4)再按Back键,RightFragment界面消失,依次执行:
onPause()、onStop()、onDestoryView()、onDestory()、onDetch()
(5)再按Back,退出程序
不执行什么方法了