mmsegmentation自定义数据集的准备,配置文件编写以及训练,测试
一、前提
确认已经安装好了mmsegmentation的环境。具体安装方法,请看官方的get_started.md。
二、数据准备
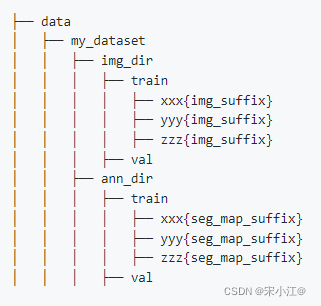
首先是结合官方的customize_datasets.md,如图:

其中img_dir中存放的就是原图,ann_dir中就是放的对应图像的"mask"。
我的数据是用labelme标注的,出来就是一张图对应一个json文件,它是只标注了每个目标物的外轮廓,大概这个样子:

然后接下来就是按照官方的说法,制作每张图对应的ann:
import os
import json
import glob
import shutil
import tqdm
import cv2
import numpy as np
from PIL import Image
from sklearn.model_selection import train_test_split

np.random.seed(0)
w, h = (1280, 1024)   # 这是我的图的大小,你看你来改


def labelme2seg(json_files: list, output_path: str):
    for json_file in tqdm.tqdm(json_files, desc="transforming:"):
        img_data = np.ones((h, w), dtype=np.uint8) * 27   # 我一共27类,你目标物多少类这里就写多少类,
        with open(json_file, encoding="utf-8") as f:
            json_data = json.load(f)
        labels_data = json_data["shapes"]
        # 将目标物区域像素填充为对应ID号
        for label_data in labels_data:
            # 下面这行,你的label不是数字的话,是汉字或者其它,自己记得稍微改一下,映射成数字,从0开始
            goods_id = int(label_data["label"])
            location = np.asarray(label_data["points"], dtype=np.int32)
            cv2.fillPoly(img_data, [location], color=(goods_id, goods_id, goods_id))

        res_img = Image.fromarray(img_data, mode="P")
        res_img_name = os.path.basename(json_file).replace(".json", ".png")
        res_img.save(os.path.join(output_path, res_img_name))
    return


if __name__ == '__main__':
    labelme_path = r"上面方.jpg和json文件的路径"
    save_path = r"最终保存的路径/my_dataset"

    img_dir_train = os.path.join(save_path, "img_dir", "train")
    img_dir_val = os.path.join(save_path, "img_dir", "val")
    img_dir_test = os.path.join(save_path, "img_dir", "test")

    ann_dit_train = os.path.join(save_path, "ann_dir", "train")
    ann_dir_val = os.path.join(save_path, "ann_dir", "val")
    ann_dir_test = os.path.join(save_path, "ann_dir", "test")

    if not os.path.exists(img_dir_train):
        os.makedirs(img_dir_train)
    if not os.path.exists(img_dir_val):
        os.makedirs(img_dir_val)
    if not os.path.exists(img_dir_test):
        os.makedirs(img_dir_test)

    if not os.path.exists(ann_dit_train):
        os.makedirs(ann_dit_train)
    if not os.path.exists(ann_dir_val):
        os.makedirs(ann_dir_val)
    if not os.path.exists(ann_dir_test):
        os.makedirs(ann_dir_test)

    json_list_path = glob.glob(labelme_path + "/*.json")
    train_path, test_val_path = train_test_split(json_list_path, test_size=0.15)
    test_path, val_path = train_test_split(test_val_path, test_size=0.15)

    # 制作mask:
    labelme2seg(train_path, ann_dit_train)
    labelme2seg(val_path, ann_dir_val)
    labelme2seg(test_path, ann_dir_test)

    # 图复制进对应位置
    for file in tqdm.tqdm(train_path, desc="copy train_img"):
        shutil.copy(file.replace(".json", ".jpg"), img_dir_train)
    for file in tqdm.tqdm(val_path, desc="copy val_img"):
        shutil.copy(file.replace(".json", ".jpg"), img_dir_val)
    for file in tqdm.tqdm(test_path, desc="copy test_img"):
        shutil.copy(file.replace(".json", ".jpg"), img_dir_test)
然后等你制作好了数据集,就把这个my_dataset文件夹放在mmsegmentation的data目录下。
特别注意:一定要看以上代码,我写的3处注释,根据你的实际情况来改,特别是类别名映射成[0, class_num-1]。除非极度巧合,不然代码肯定的是会报错的。
三、配置文件
自定义数据类
在mmseg/datasets新建一个文件my_dataset.py仿造其它的数据集写下如下内容:
from .builder import DATASETS
from .custom import CustomDataset


@DATASETS.register_module()
class MyDataset(CustomDataset):
    # 写你实际的类别名就好了,最后再加上一个background
    CLASSES = (
        'T01', 'T02', 'T03', 'T04', 'T05', 'T06', 'T07', 'T08', 'T09', 'T10', 'T11', 'T12', 'T13',
        'T14', 'T15', 'T16', 'T17', 'T18', 'T19', 'T20', 'T21', 'T22', 'T23', 'T24', 'T25','T26', 'background'
    )
    # 这个数量与上面个数对应就好了
    PALETTE = [[120, 120, 120], [180, 120, 120], [6, 230, 230], [80, 50, 50],
               [4, 200, 3], [120, 120, 80], [140, 140, 140], [204, 5, 255],
               [230, 230, 230], [4, 250, 7], [224, 5, 255], [235, 255, 7],
               [150, 5, 61], [120, 120, 70], [8, 255, 51], [255, 6, 82],
               [143, 255, 140], [204, 255, 4], [255, 51, 7], [204, 70, 3],
               [0, 102, 200], [61, 230, 250], [255, 6, 51], [11, 102, 255],
               [255, 7, 71], [255, 9, 224], [9, 7, 230], [220, 220, 220]]

    def __init__(self, **kwargs):
        super(MyDataset, self).__init__(
            **kwargs
        )
然后在mmseg/datasets/__init__.py中把自己的数据集添加进去(主要是添加以下两行):
from .my_dataset import MyDataset
# 在 __all__中添加自己的类名
__all__ = [
    '......', 'LoveDADataset', 'MyDataset'       # 最后添加这个
]
自定义配置文件
首先说明,这是仿照configs/pspnet/pspnet_r50-d8_512x512_160k_ade20k.py这一配置文件来写的,其它的大同小异,把pspnet_r50-d8_512x512_160k_ade20k.py配置文件中的是用到的几个配置文件都写进了一个文件里my_psp.py,放在configs/pspnet下,内容如下:
# 参考 pspnet_r50-d8_512x512_160k_ade20k 来做的

# 1.model:根据'../_base_/models/pspnet_r50-d8.py'
# model settings
norm_cfg = dict(type='SyncBN', requires_grad=True)
model = dict(
    type='EncoderDecoder',
    pretrained='open-mmlab://resnet50_v1c',
    backbone=dict(
        type='ResNetV1c',
        depth=50,
        num_stages=4,
        out_indices=(0, 1, 2, 3),
        dilations=(1, 1, 2, 4),
        strides=(1, 2, 1, 1),
        norm_cfg=norm_cfg,
        norm_eval=False,
        style='pytorch',
        contract_dilation=True),
    decode_head=dict(
        type='PSPHead',
        in_channels=2048,
        in_index=3,
        channels=512,
        pool_scales=(1, 2, 3, 6),
        dropout_ratio=0.1,
        num_classes=28,   # 注意改这个类别数,我的是27类+最后一个background
        norm_cfg=norm_cfg,
        align_corners=False,
        loss_decode=dict(
            type='CrossEntropyLoss', use_sigmoid=False, loss_weight=1.0)),
    auxiliary_head=dict(
        type='FCNHead',
        in_channels=1024,
        in_index=2,
        channels=256,
        num_convs=1,
        concat_input=False,
        dropout_ratio=0.1,
        num_classes=28,       # 注意改这个值,
        norm_cfg=norm_cfg,
        align_corners=False,
        loss_decode=dict(
            type='CrossEntropyLoss', use_sigmoid=False, loss_weight=0.4)),
    # model training and testing settings
    train_cfg=dict(),
    test_cfg=dict(mode='whole'))


# 2. data:根据'../_base_/datasets/ade20k.py'
# dataset settings
dataset_type = 'MyDataset'   # 自己mmseg/datasets/my_dataset.py中的类名
data_root = 'data/my_dataset'
img_norm_cfg = dict(
    mean=[123.675, 116.28, 103.53], std=[58.395, 57.12, 57.375], to_rgb=True)
crop_size = (512, 512)
train_pipeline = [
    dict(type='LoadImageFromFile'),
    dict(type='LoadAnnotations', reduce_zero_label=True),
    dict(type='Resize', img_scale=(1280, 1024), ratio_range=(0.5, 2.0)),   # img_scale我还是就用的我原图的大小,你可以改成你的大小,其他地方同步改
    dict(type='RandomCrop', crop_size=crop_size, cat_max_ratio=0.75),
    dict(type='RandomFlip', prob=0.5),
    dict(type='PhotoMetricDistortion'),
    dict(type='Normalize', **img_norm_cfg),
    dict(type='Pad', size=crop_size, pad_val=0, seg_pad_val=255),
    dict(type='DefaultFormatBundle'),
    dict(type='Collect', keys=['img', 'gt_semantic_seg']),
]
test_pipeline = [
    dict(type='LoadImageFromFile'),
    dict(
        type='MultiScaleFlipAug',
        img_scale=(1280, 1024),
        # img_ratios=[0.5, 0.75, 1.0, 1.25, 1.5, 1.75],
        flip=False,
        transforms=[
            dict(type='Resize', keep_ratio=True),
            dict(type='RandomFlip'),
            dict(type='Normalize', **img_norm_cfg),
            dict(type='ImageToTensor', keys=['img']),
            dict(type='Collect', keys=['img']),
        ])
]
data = dict(
    samples_per_gpu=4,   # 显存不够,来把这改小
    workers_per_gpu=4,
    train=dict(
        type=dataset_type,
        data_root=data_root,
        img_dir='img_dir/train',
        ann_dir='ann_dir/train',
        pipeline=train_pipeline),
    val=dict(
        type=dataset_type,
        data_root=data_root,
        img_dir='img_dir/val',
        ann_dir='ann_dir/val',
        pipeline=test_pipeline),
    test=dict(
        type=dataset_type,
        data_root=data_root,
        img_dir='img_dir/test',
        ann_dir='ann_dir/test',
        pipeline=test_pipeline))


# 3. 根据:'../_base_/default_runtime.py'
# yapf:disable
log_config = dict(
    interval=50,
    hooks=[
        dict(type='TextLoggerHook', by_epoch=False),
        # dict(type='TensorboardLoggerHook')
    ])
# yapf:enable
dist_params = dict(backend='nccl')
log_level = 'INFO'
load_from = None
resume_from = None
workflow = [('train', 1)]
cudnn_benchmark = True


# 4. schedules:根据'../_base_/schedules/schedule_160k.py'
# optimizer
optimizer = dict(type='SGD', lr=0.01, momentum=0.9, weight_decay=0.0005)   # 根据自己情况改学习率吧
optimizer_config = dict()
# learning policy
lr_config = dict(policy='poly', power=0.9, min_lr=1e-4, by_epoch=False)
# runtime settings
runner = dict(type='IterBasedRunner', max_iters=160000)
checkpoint_config = dict(by_epoch=False, interval=16000)
evaluation = dict(interval=16000, metric='mIoU', pre_eval=True)
训练
在mmsegmentation目录下,激活你的虚拟环境,然后执行:
单张GPU:python tools/train.py configs/pspnet/my_psp.py
两张GPU:./tools/dist_train.sh configs/pspnet/my_psp.py 2
然后你应该就能看到这个效果:

然后就大功告成。
四、结果测试
把测试集的结果保存起来:
python tools/test.py configs/pspnet/my_psp.py work_dirs/my_psp/latest.pth --show-dir ./mypsp_output
如果想像官方demo展示一样的话,就还需要修改文件mmseg/core/evaluation/class_names.py:
仿照里面已有的数据写,添加(与上面保持一致)
# for myself dataset
def mydata_classes():
    return [
        'T01', 'T02_1', 'T02_2', 'T02_3', 'T03_1', 'T03_2', 'T03_3', 'T04', 'T05', 'T06', 'T07', 'T08', 'T09', 'T10',
        'T11', 'T12', 'T13', 'T14', 'T15', 'T16', 'T17', 'T18', 'T19', 'T20', 'T21', 'T22', 'T26', 'background'
    ]

def mydata_palette():
    return [[120, 120, 120], [180, 120, 120], [6, 230, 230], [80, 50, 50],
            [4, 200, 3], [120, 120, 80], [140, 140, 140], [204, 5, 255],
            [230, 230, 230], [4, 250, 7], [224, 5, 255], [235, 255, 7],
            [150, 5, 61], [120, 120, 70], [8, 255, 51], [255, 6, 82],
            [143, 255, 140], [204, 255, 4], [255, 51, 7], [204, 70, 3],
            [0, 102, 200], [61, 230, 250], [255, 6, 51], [11, 102, 255],
            [255, 7, 71], [255, 9, 224], [9, 7, 230], [220, 220, 220]]
这里面还有一处需要修改:
dataset_aliases = {
    'cityscapes': ['cityscapes'],
    'ade': ['ade', 'ade20k'],
    'voc': ['voc', 'pascal_voc', 'voc12', 'voc12aug'],
    'mydata': ['mydata']     # 这处是自己添加的
}
Tips:函数名这些别写错了,想要改成别的也一定要全部一起改。
然后可以用官方展示demo的方式来展示你的结果了:
python demo/image_demo.py data/my_dataset/img_dir/test/10740.jpg work_dirs/my_psp/my_psp.py work_dirs/my_psp/latest.pth --device cuda:0 --palette mydata
再次说明,一定要看我代码里写的注释说明,根据你的实际情况来改,除非极度巧合,不然直接拿来就跑,肯定是会出错的。
我这里都是自己成功跑通了的,也是学习摸索中,如果哪里有什么问题,还请交流、雅正。
希望能帮到你~